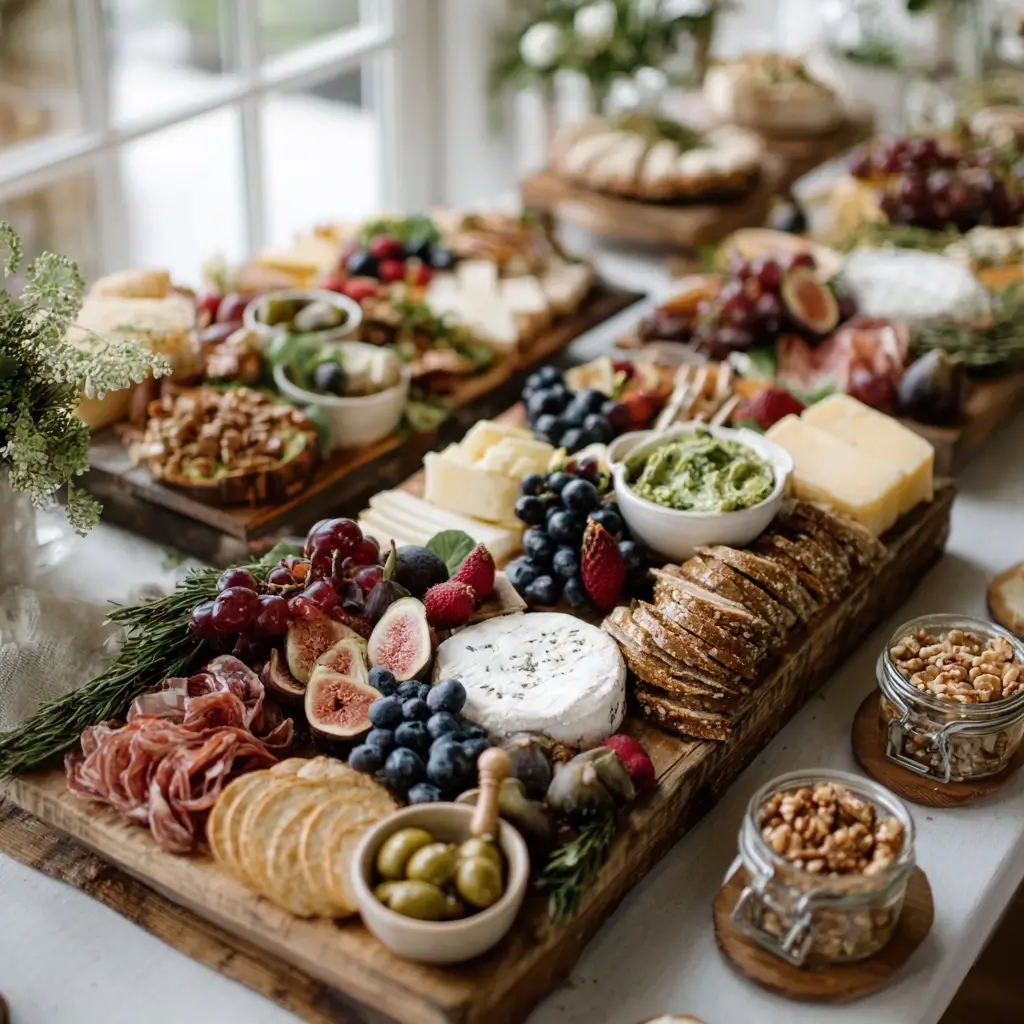
There is something so joyful about setting out a big outdoor spread and letting everyone wander, nibble, and chat. This Summer Grazing Table is all about easy hosting, fresh colors, and simple bites that feel special without making you spend all day in the kitchen.

Summer Grazing Table
Equipment
- 1 Large cutting board or serving tray
- 1 Serving bowls for dips and loose items
- 1 Serving tongs or spoons
Ingredients
Main Ingredients
- Assorted cheese such as cheddar, gouda, mozzarella balls, or mild blue cheese
- Cured meats such as salami, prosciutto, or turkey slices
- Fresh fruit such as grapes, strawberries, cherries, melon, or figs
- Crisp vegetables such as cucumber, radishes, cherry tomatoes, and bell pepper strips
- Crackers breadsticks, pita chips, or sliced baguette
- Dips and spreads such as hummus, whipped cream cheese, tzatziki, or pesto
- Olives pickles, or marinated artichokes
- Fresh herbs such as basil, mint, or rosemary
- Sweet extras such as dark chocolate, honey, or jam
- Optional nuts and seeds such as almonds, pistachios, or pumpkin seeds
Instructions
- Use a large cutting board, serving tray, or clean section of table. If you are serving outdoors, pick a sturdy surface and line it with parchment or a food-safe board if needed.
- Place bowls for dips, olives, pickles, or any loose ingredients. Then add the cheeses, since they help anchor the layout and give the table structure.
- Fold or fan the cured meats so they look generous and easy to grab. Nestle crackers, bread, or breadsticks near the cheeses and spreads so guests can build bites naturally.
- Arrange the fresh produce in clusters, mixing colors and shapes for a lively look. Keep juicy fruit together so the table stays neat and easy to serve from.
- Tuck herbs between the food, then scatter nuts, seeds, or a little chocolate where there are empty spaces. These little details make the table feel abundant and finished.
- Set out small plates, napkins, and serving tongs or spoons. As guests enjoy the spread, refill the table with fresh pieces so it stays pretty and inviting.
Notes
Why You’ll Love This Summer Grazing Table
This is the kind of gathering food that looks impressive but is secretly very easy to build. You can mix sweet, savory, crunchy, creamy, and juicy ingredients, then arrange everything on one large board or a few smaller platters.
It also works beautifully for almost any crowd. You can scale it up for a party or keep it smaller for a relaxed family afternoon outside.
Summer Grazing Table Ingredients & Substitutions
Think of this as a flexible blueprint, not a strict recipe. Choose a few items from each group so the table feels balanced and abundant.
- Cheese, such as cheddar, gouda, mozzarella balls, or a mild blue cheese if your guests enjoy it
- Cured meats, such as salami, prosciutto, or turkey slices
- Fresh fruit, such as grapes, strawberries, cherries, melon, or figs
- Crisp vegetables, such as cucumber, radishes, cherry tomatoes, and bell pepper strips
- Crackers, breadsticks, pita chips, or sliced baguette
- Dips and spreads, such as hummus, whipped cream cheese, tzatziki, or pesto
- Olives, pickles, or marinated artichokes for a salty bite
- Fresh herbs, such as basil, mint, or rosemary, for color and aroma
- Sweet extras, such as dark chocolate, honey, or jam
- Optional nuts and seeds, such as almonds, pistachios, or pumpkin seeds
If you want to keep things simple, start with just one cheese, one meat, two fruits, two vegetables, one dip, and one crunchy element. That is usually enough to make the spread feel full.
Step-by-Step Instructions to Make Summer Grazing Table
Step 1: Choose your base
Use a large cutting board, serving tray, or clean section of table. If you are serving outdoors, pick a sturdy surface and line it with parchment or a food-safe board if needed.
Step 2: Set out the bigger items first
Place bowls for dips, olives, pickles, or any loose ingredients. Then add the cheeses, since they help anchor the layout and give the table structure.
Step 3: Add the meats and breads
Fold or fan the cured meats so they look generous and easy to grab. Nestle crackers, bread, or breadsticks near the cheeses and spreads so guests can build bites naturally.
Step 4: Fill in with fruit and vegetables
Arrange the fresh produce in clusters, mixing colors and shapes for a lively look. Keep juicy fruit together so the table stays neat and easy to serve from.
Step 5: Add small finishing touches
Tuck herbs between the food, then scatter nuts, seeds, or a little chocolate where there are empty spaces. These little details make the table feel abundant and finished.
Step 6: Serve and refresh
Set out small plates, napkins, and serving tongs or spoons. As guests enjoy the spread, refill the table with fresh pieces so it stays pretty and inviting.
Tips for Success
Keep the table in the shade if possible, especially on warm days. Chilled foods stay fresher longer, and the spread will look better throughout the gathering.
Vary the textures and colors so every section feels interesting. A mix of creamy, crisp, juicy, and crunchy ingredients makes the whole table more appealing.
Do a little prep ahead of time, but wait to slice delicate fruit until close to serving. That helps everything stay fresh and bright.
Variations of Summer Grazing Table
Make it Mediterranean with hummus, cucumbers, olives, feta, pita, and grapes. This version feels bright, fresh, and easy to assemble.
Go brunch-style with mini muffins, berries, yogurt dip, sliced melon, cheese, and fruit jam. It is lovely for a morning get-together.
For a more savory spread, add roasted vegetables, nuts, multiple cheeses, turkey slices, and herb dips. This version works especially well for an evening meal outdoors.
Serving Suggestions: What to Pair with Summer Grazing Table
Serve this spread with sparkling water, lemonade, iced tea, or fresh fruit spritzers. These drinks keep the table feeling light and summery.
If you want to turn it into a fuller meal, pair it with grilled chicken, a simple pasta salad, or a chilled soup. The grazing table can act as the centerpiece while the rest of the meal stays easy.
Storage & Reheating Instructions
Store leftovers in separate airtight containers as soon as the gathering ends. Keep cheese, fruit, vegetables, and dips apart so everything stays fresher.
Most items do not need reheating. If you served bread or crackers and they softened, you can crisp them briefly in the oven before serving again.
Use cut fruit and opened dips within a couple of days for the best texture and flavor. Fresh herbs are best added just before serving if you are rebuilding the table.
Memories Made Around the Table
Some of my favorite summer moments have happened around a table like this, with people leaning in, choosing little bites, and staying just a bit longer than planned. A grazing table invites that kind of easy togetherness, and that is part of what makes it so special.
FAQs
How far in advance can I make a grazing table?
You can prep many of the ingredients a few hours ahead, but I recommend assembling the table close to serving time so everything looks fresh. Cut delicate fruit and add herbs at the end.
What foods should I avoid on a hot day?
Avoid items that spoil quickly or wilt fast in the sun. Keep the spread shaded and chilled, and choose sturdy ingredients that hold up well outdoors.
How do I make the table look full without spending too much?
Use a mix of bowls, loose produce, and layered items to create volume. A few well-placed clusters can make the table feel abundant even on a modest budget.
Can I make this without meat?
Yes, absolutely. Add extra cheese, hummus, nuts, roasted vegetables, and fruit to build a satisfying meat-free spread.
Final Thoughts
A beautiful grazing table does not have to be complicated. With a few fresh ingredients, a little thoughtfulness, and a relaxed style, you can create an outdoor spread that feels welcoming, colorful, and memorable.