If you want a party appetizer that looks impressive without adding stress, these charcuterie cones are such a fun choice. They are easy to customize, simple to serve, and always feel a little special when handed to each guest.

Charcuterie Cones
Equipment
- 1 Mini appetizer cones or sturdy paper cone cups
- 1 Tray or cone holder optional
- 1 Parchment Paper optional
Instructions
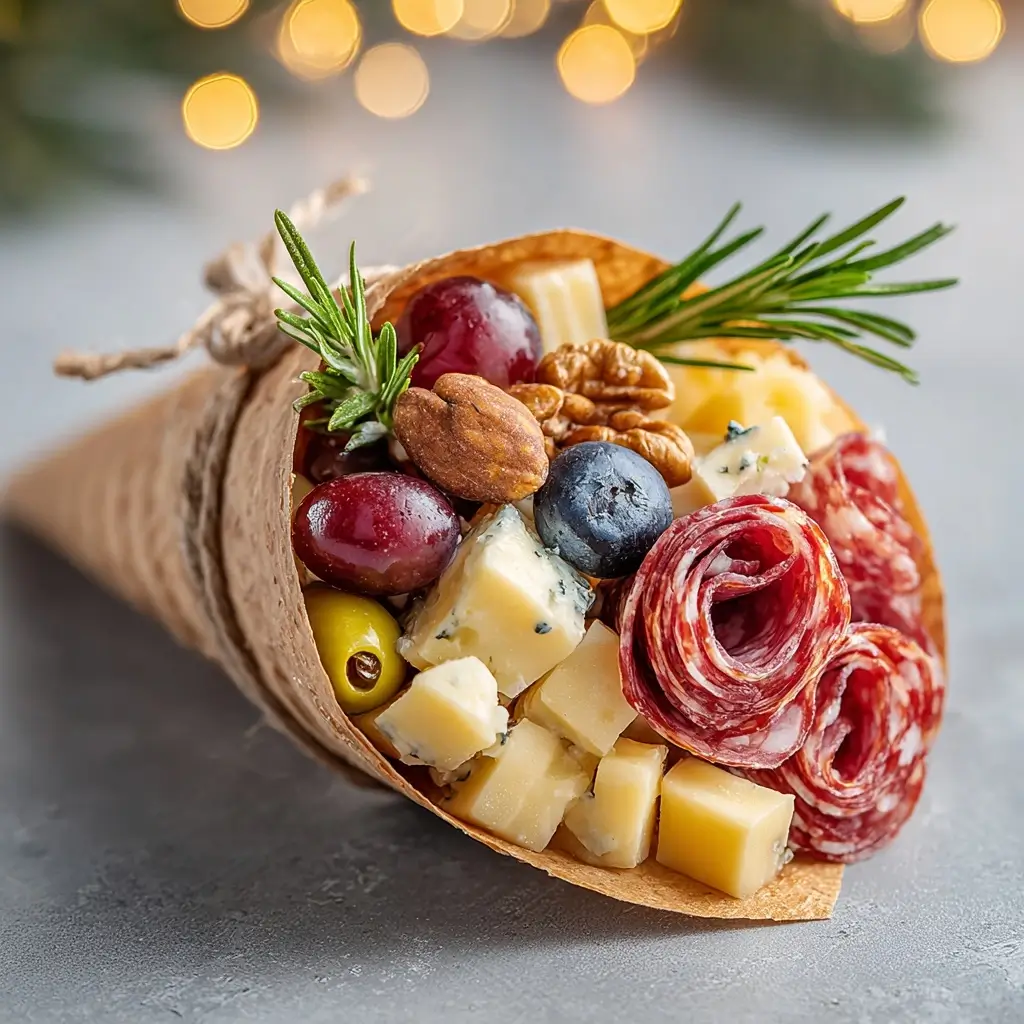
- Wash and dry the produce, cut the cheese into bite-size pieces, and fold or slice the turkey into small portions. Break crackers or breadsticks into shorter pieces so they fit neatly into the cones.
- Set out your cones or paper cups on a tray or in small holders so they stay upright while you fill them. If needed, line the bottom with a small piece of parchment to help keep things tidy.
- Start with the sturdier items first, such as crackers, cheese, and turkey. Then tuck in grapes, olives, cucumbers, and tomatoes to fill the gaps and add color.
- Add a small herb sprig or a tiny spoonful of dip if you are using one. This last touch makes each cone look polished and party-ready.
- Serve the cones soon after assembling for the freshest texture. If you need to prep ahead, cover them lightly and refrigerate for a short time before serving.
Notes
Why You’ll Love This Charcuterie Cones
These charcuterie cones bring all the best parts of a grazing board into a neat, portable serving style. They are perfect for birthdays, showers, game days, or any gathering where you want guests to mingle comfortably.
They also help with portion control, since each person gets their own little cone of snacks. That means less crowding around the table and more time enjoying the party.
Charcuterie Cones Ingredients & Substitutions
Here is a simple mix-and-match list you can use to build each cone:
- Mini appetizer cones or sturdy paper cone cups
- Cheese cubes, such as cheddar, mozzarella, gouda, or pepper jack
- Sliced turkey, folded into ribbons or small rolls
- Fresh grapes or berries
- Cherry tomatoes
- Olives
- Cucumber slices
- Crackers or breadsticks, broken to fit
- Roasted nuts
- Fresh herbs, such as rosemary or basil, for garnish
- Optional spreads, such as hummus, cream cheese, or mustard
If you want to make changes, use what you already have on hand. Swap turkey for grilled chicken strips, extra cheese, or marinated chickpeas. For the crunch factor, pretzels, pita chips, or seed crackers all work well.
Step-by-Step Instructions to Make Charcuterie Cones
Step 1: Prep the ingredients
Wash and dry the produce, cut the cheese into bite-size pieces, and fold or slice the turkey into small portions. Break crackers or breadsticks into shorter pieces so they fit neatly into the cones.
Step 2: Choose your cone base
Set out your cones or paper cups on a tray or in small holders so they stay upright while you fill them. If needed, line the bottom with a small piece of parchment to help keep things tidy.
Step 3: Build with color and texture
Start with the sturdier items first, such as crackers, cheese, and turkey. Then tuck in grapes, olives, cucumbers, and tomatoes to fill the gaps and add color.
Step 4: Finish with a garnish
Add a small herb sprig or a tiny spoonful of dip if you are using one. This last touch makes each cone look polished and party-ready.
Step 5: Serve right away or chill briefly
Serve the cones soon after assembling for the freshest texture. If you need to prep ahead, cover them lightly and refrigerate for a short time before serving.
Tips for Success
Keep the ingredients dry so the cones do not get soggy. Pat fruits and vegetables well after washing, and avoid overly juicy ingredients unless they will be eaten quickly.
Try to balance colors in each cone, since that is what gives them such a festive look. A mix of red, green, gold, and white ingredients always photographs beautifully and feels inviting on the table.
If you are serving a larger crowd, make a few cones with different flavor themes. A savory cone, a fresh veggie cone, and a sweeter fruit-and-cheese cone can give guests more variety.
Variations of Charcuterie Cones
You can easily tailor these cones to match the occasion. For a brunch table, use berries, cheese, mini muffins, and cucumber ribbons. For an evening gathering, focus on cured-style turkey slices, olives, nuts, and stronger cheeses.
You can also create a vegetarian version with hummus, roasted vegetables, pickles, fruit, and a variety of crackers. If you want a kid-friendly version, keep it simple with cheese, grapes, pretzels, and apple slices.
Serving Suggestions: What to Pair with Charcuterie Cones
These cones pair nicely with sparkling water, lemonade, iced tea, or a fruity punch. They also work well alongside soup, salad, sliders, or a sandwich spread if you are building a bigger menu.
For a complete party table, serve them with a dip board or a simple dessert platter. That gives guests a nice variety without making the spread feel complicated.
Storage & Reheating Instructions
Charcuterie cones are best enjoyed fresh, but you can store leftover ingredients separately in airtight containers. Keep cheese, turkey, and produce chilled, and assemble the cones just before serving when possible.
There is no reheating needed for this recipe. If the cones have already been filled, eat them the same day for the best texture and appearance.
Memories Made Around the Table
Some of the best party food is the kind that gets people talking before the first bite. These little cones often become a conversation starter, especially when everyone gets to see their own colorful mix.
That is one of the reasons I love serving food this way, it feels personal, cheerful, and just a little bit playful.
FAQs
Can I make charcuterie cones ahead of time?
Yes, you can prep the ingredients ahead and assemble them shortly before serving. If you need to build them earlier, keep the wetter ingredients separate until the last minute.
What kind of cone works best?
Sturdy paper cone cups or mini appetizer cones work best because they hold their shape and are easy to carry. Choose a size that fits a few bites without feeling too packed.
How do I keep the cones from tipping over?
Place them in a muffin tin, a cone holder, or a tray with small openings to keep them stable. You can also nestle them in a bowl of dry beans or rice for support during setup, then remove them before serving.
Can I make these without meat?
Absolutely. Fill them with cheese, fruit, nuts, olives, veggies, crackers, and a dip or spread for a meatless version that still feels abundant.
Final Thoughts
Charcuterie cones are a simple way to turn a familiar appetizer into something memorable and fun. With a little color, a mix of textures, and thoughtful assembly, they bring easy style to any party table.