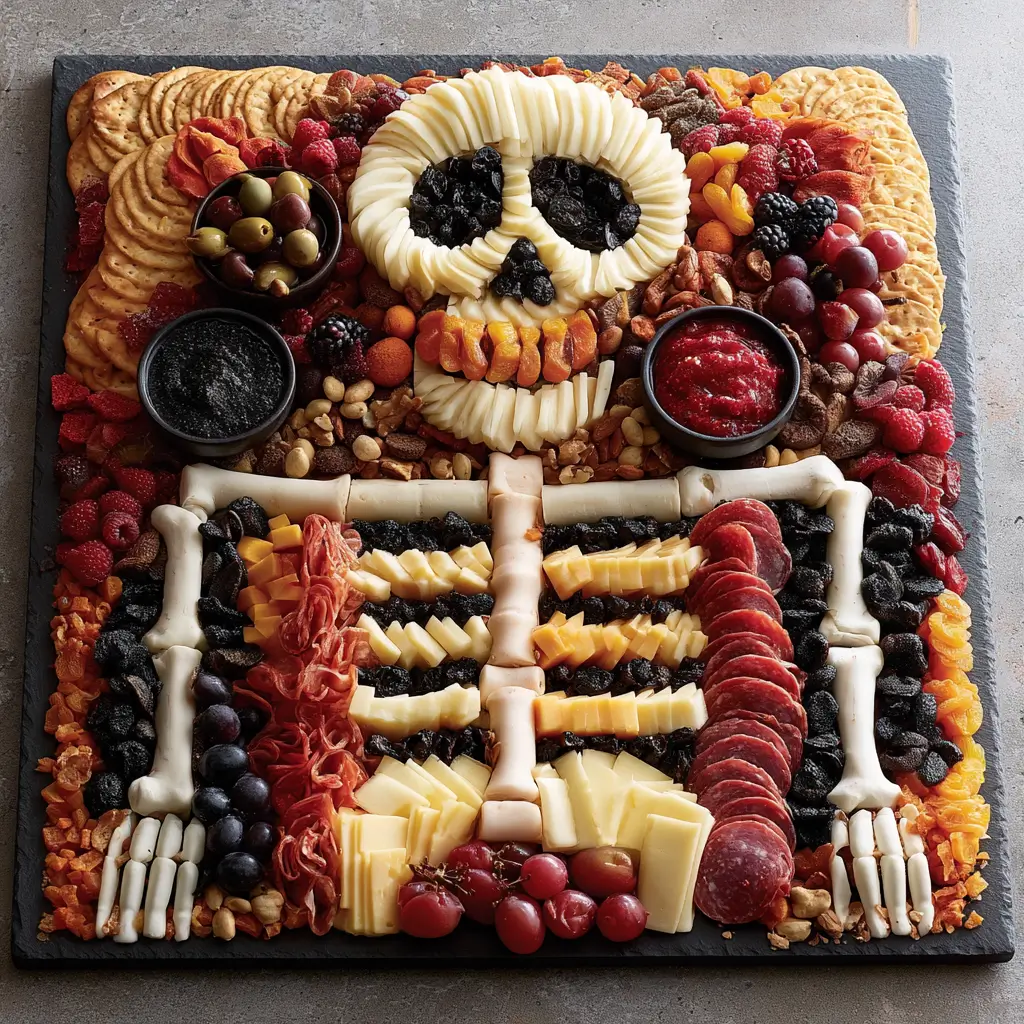
Looking for a party platter that feels playful, festive, and easy to put together? This Halloween Skeleton Snack Board for Parties is a fun mix of sweet and savory bites arranged into a spooky skeleton shape that guests will love.
Halloween Skeleton Snack Board
Equipment
- 1 Large board, platter, or rimmed tray
- 1 Small bowl or plate for the skull area
Ingredients
Skeleton Snack Board Ingredients
- 1 large board, platter, or rimmed tray for serving
- 1 small bowl or plate for the skull area
- crackers for the skeleton body and serving base
- cheese cubes or sliced cheese for the skull and bones
- turkey slices or deli chicken for savory roll ups
- grapes for color and easy snacking
- strawberries for a bright sweet option
- apple slices lightly tossed with lemon juice to prevent browning
- baby carrots for crunch
- cucumber rounds for freshness
- hummus or ranch dip for scooping
- olives for small spooky details
- pretzel sticks for rib bones or extra crunch
- chocolate covered pretzels for a sweet touch
- marshmallows or mini cookies for decorating the skull area
Instructions
- Start with a large board, platter, or rimmed tray. A dark board makes the spooky theme stand out, but any large serving surface will work.
- Place one round bowl or small plate near the top for the skull area. Arrange crackers, cheese pieces, and rolled deli slices down the center to form the spine and ribs. Use longer items like pretzel sticks or cucumber spears for arms and legs.
- Fill the open spaces with grapes, strawberries, apple slices, carrots, and olives. Keep the colors balanced so the board looks full and festive.
- Place hummus, ranch, or another favorite dip in a small bowl on the board. Add extra crackers, pretzels, or cookies around the edges, then adjust the layout until the skeleton shape looks clear and fun.
Notes
Why You’ll Love This Halloween Skeleton Snack Board
This board is the kind of party food that looks impressive without needing much cooking. It is flexible, easy to customize, and gives you a chance to mix colors, textures, and flavors in one big centerpiece.
You can make it ahead, serve it at room temperature, and adapt it to the ages and tastes of your guests. It is also a great way to build a party spread that feels special with very little stress.
Halloween Skeleton Snack Board Ingredients & Substitutions
Here is a simple mix of ingredients you can use to build your skeleton board. Choose what works best for your crowd and what you already have on hand.
- Crackers, for the skeleton body and serving base
- Cheese cubes or sliced cheese, for the skull and bones
- Turkey slices or deli chicken, for savory roll ups
- Grapes, for color and easy snacking
- Strawberries, for a bright sweet option
- Apple slices, lemon juice lightly tossed to prevent browning
- Baby carrots, for crunch
- Cucumber rounds, for freshness
- Hummus or ranch dip, for scooping
- Olives, for small spooky details
- Pretzel sticks, for rib bones or extra crunch
- Chocolate covered pretzels, for a sweet touch
- Marshmallows or mini cookies, for decorating the skull area
If you want to swap ingredients, keep the same mix of colors and textures. Use grapes instead of strawberries, cheese sticks instead of cubes, or sliced bell peppers instead of carrots.
Step-by-Step Instructions to Make Halloween Skeleton Snack Board
Step 1: Choose your board
Start with a large board, platter, or rimmed tray. A dark board makes the spooky theme stand out, but any large serving surface will work.
Step 2: Build the skeleton shape
Place one round bowl or small plate near the top for the skull area. Arrange crackers, cheese pieces, and rolled deli slices down the center to form the spine and ribs. Use longer items like pretzel sticks or cucumber spears for arms and legs.
Step 3: Add sweet and fresh bites
Fill the open spaces with grapes, strawberries, apple slices, carrots, and olives. Keep the colors balanced so the board looks full and festive.
Step 4: Add dip and finishing touches
Place hummus, ranch, or another favorite dip in a small bowl on the board. Add extra crackers, pretzels, or cookies around the edges, then adjust the layout until the skeleton shape looks clear and fun.
Tips for Success
Use a mix of shapes and sizes so the board feels full and interesting. If you are serving children, keep the ingredients simple and easy to grab.
Build the board close to serving time if you are using cut fruit or vegetables. If you need to prep early, store the cut ingredients separately and assemble everything right before guests arrive.
Think about balance, not perfection. A snack board looks best when it feels abundant and a little playful.
Variations of Halloween Skeleton Snack Board
You can turn this board in lots of different directions depending on the party menu. For a sweeter version, add more fruit, cookies, and chocolate treats. For a savory version, use more cheese, crackers, deli chicken, hummus, and vegetables.
You can also make it more kid friendly by using cheese sticks, mini sandwiches, and apple slices. For an elegant party spread, add sliced pears, almonds, grapes, and a few fancy dips.
Serving Suggestions: What to Pair with Halloween Skeleton Snack Board
This board pairs nicely with simple party drinks like sparkling water with citrus slices, apple cider, or fruit punch. It also works well beside a warm soup, a pasta dish, or a tray of baked bites if you are serving a larger crowd.
If you want to build a full Halloween table, add a second platter with cookies, cupcakes, or another themed snack mix. The skeleton board can act as the centerpiece while the rest of the menu stays easy.
Storage & Reheating Instructions
Store leftovers by separating the items into airtight containers. Keep fresh fruit, vegetables, cheese, and deli slices chilled in the refrigerator.
This board does not need reheating. If you made dips or sliced items ahead of time, refresh them with a quick stir or a fresh cut before serving again.
Memories Made Around the Table
Some of my favorite party dishes are the ones that bring people together before the first bite. A playful board like this gets everyone talking, reaching, and laughing as they choose their favorites.
It is a small reminder that festive food does not have to be complicated to feel special. Sometimes the most memorable dishes are the ones that invite everyone to gather close and enjoy the moment.
FAQs
Can I make this snack board ahead of time?
Yes, you can prep most of the ingredients a few hours ahead. Keep everything chilled and assemble the board just before serving for the best look and texture.
What can I use instead of deli meat?
You can leave it out completely or use extra cheese, hummus, roasted vegetables, or veggie sticks. The board still works well with a mix of sweet and savory items.
How do I make the skeleton shape easy to see?
Use a bowl for the skull, then create a clear line of food down the center for the spine. Add longer pieces on the sides for arms and legs so the shape reads right away.
What size board should I use?
A large platter or board works best for a party. If you are serving a smaller group, you can scale the ingredients down and use a medium tray instead.
Final Thoughts
This Halloween Skeleton Snack Board for Parties is simple, colorful, and so much fun to serve. With a few easy ingredients and a playful layout, you can create a party centerpiece that feels festive without adding extra stress to your day.