
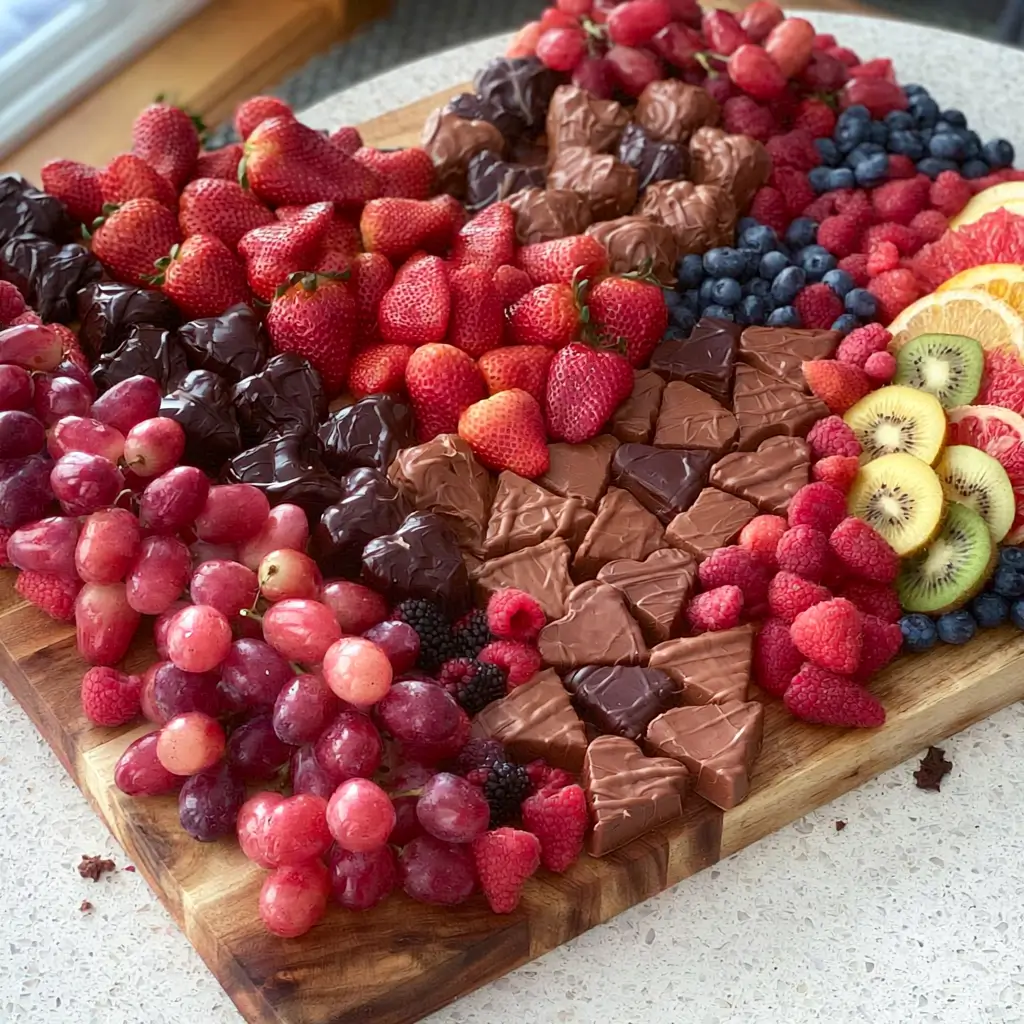
If you want a simple centerpiece that feels special, this Chocolate Fruit Board is such a lovely choice. It is colorful, easy to assemble, and perfect for sharing with family or friends.
Chocolate Fruit Board
Equipment
- 1 Large serving board, platter, or tray
- 1 Small bowls for chocolate dip or melted chocolate
Ingredients
- assorted fresh fruit such as strawberries, grapes, raspberries, blueberries, kiwi, pineapple, apple slices, and banana slices
- chocolate pieces or chocolate bars chopped
- chocolate dip or melted chocolate made with a little cream or milk
- crackers, cookies, or pretzels for extra crunch
- nut butter or seed butter optional for dipping
- chopped nuts, shredded coconut, or sprinkles optional toppings
Instructions
- Wash all fruit well, then dry it thoroughly so the board stays neat. Slice larger fruit into easy-to-grab pieces and keep small berries whole.
- Use a large serving board, platter, or tray. A wooden board gives a cozy, inviting look, but any wide flat surface will work.
- Set bowls of chocolate dip, melted chocolate, or small piles of chocolate pieces around the board. This helps anchor the layout and makes the board feel balanced.
- Arrange the fruit in small clusters around the chocolate. Mix colors and shapes so the board feels full and vibrant.
- Tuck in crackers, cookies, pretzels, nuts, or coconut to fill empty spaces. The goal is a board that looks abundant and easy to snack from.
- Add any final toppings, then serve right away for the freshest taste and best presentation.
Notes
Why You’ll Love This Chocolate Fruit Board
This board brings together fresh fruit, rich chocolate, and plenty of texture in one beautiful spread. It works well for parties, quiet weekends, or any time you want a dessert that looks impressive without much effort.
Chocolate Fruit Board Ingredients & Substitutions
- Assorted fresh fruit, such as strawberries, grapes, raspberries, blueberries, kiwi, pineapple, apple slices, and banana slices
- Chocolate pieces or chocolate bars, chopped
- Chocolate dip or melted chocolate made with a little cream or milk
- Crackers, cookies, or pretzels for extra crunch
- Nut butter or seed butter, optional for dipping
- Chopped nuts, shredded coconut, or sprinkles, optional toppings
For substitutions, use whatever fruit is in season and looks best. If you want a richer board, add dark chocolate, milk chocolate, or white chocolate. For a smoother dip, use melted chocolate with a little cream, or a dairy-free alternative if preferred.
Step-by-Step Instructions to Make Chocolate Fruit Board
Step 1: Prepare the fruit
Wash all fruit well, then dry it thoroughly so the board stays neat. Slice larger fruit into easy-to-grab pieces and keep small berries whole.
Step 2: Choose your board
Use a large serving board, platter, or tray. A wooden board gives a cozy, inviting look, but any wide flat surface will work.
Step 3: Place the chocolate first
Set bowls of chocolate dip, melted chocolate, or small piles of chocolate pieces around the board. This helps anchor the layout and makes the board feel balanced.
Step 4: Add the fruit
Arrange the fruit in small clusters around the chocolate. Mix colors and shapes so the board feels full and vibrant.
Step 5: Fill in the gaps
Tuck in crackers, cookies, pretzels, nuts, or coconut to fill empty spaces. The goal is a board that looks abundant and easy to snack from.
Step 6: Finish and serve
Add any final toppings, then serve right away for the freshest taste and best presentation.
Tips for Success
Dry the fruit well before arranging it, because extra moisture can make the board messy. Keep banana and apple slices from browning by adding them closer to serving time, and use a little lemon juice if needed. If you are making the board ahead, cover it loosely and chill it until ready to serve.
Variations of Chocolate Fruit Board
Try a dark chocolate board with extra berries for a more intense flavor. You can also make a white chocolate version with strawberries and raspberries, or add marshmallows and cookies for a sweeter dessert spread. For a little crunch, sprinkle on toasted nuts or granola.
Serving Suggestions: What to Pair with Chocolate Fruit Board
Serve this board with coffee, hot chocolate, milk, or a simple fruit tea. It also pairs nicely with other light desserts, vanilla-free whipped cream, or a scoop of ice cream if you want an extra special treat.
Storage & Reheating Instructions
Store leftovers in an airtight container in the refrigerator for up to 2 days, though the fruit is best enjoyed sooner. Keep any chocolate dip separate when possible, and do not reheat the fruit board. If the chocolate dip firms up, warm it gently before serving again.
Memories Made Around the Table
Boards like this always remind me of easy gatherings where everyone reaches in, tries a little of everything, and keeps coming back for one more bite. It is the kind of dessert that feels relaxed, welcoming, and perfect for sharing.
FAQs
Can I make this Chocolate Fruit Board ahead of time?
Yes, you can prep the fruit and chocolate earlier in the day. For the best look and texture, assemble the board close to serving time.
What fruit works best on a Chocolate Fruit Board?
Strawberries, grapes, raspberries, blueberries, kiwi, pineapple, and apple slices all work very well. Choose a mix of sweet, tart, and juicy fruit for balance.
How do I keep fruit from browning?
Use a little lemon juice on apples and bananas, or add those fruits just before serving. Keeping the board chilled also helps.
Can I use store-bought chocolate dip?
Yes, store-bought chocolate dip works wonderfully and saves time. You can also make your own if you want a homemade touch.
Final Thoughts
This Chocolate Fruit Board is proof that simple ingredients can still feel festive and inviting. It is easy to customize, beautiful to serve, and always a crowd-pleaser.