
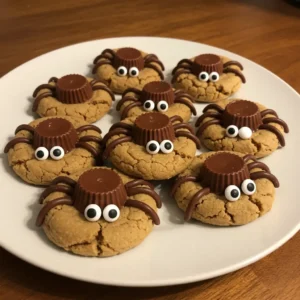
Halloween is the perfect time for fun and slightly creepy desserts that make everyone smile. These Spooky Peanut Butter Spider Cookies are soft, chewy, and topped with chocolate candy spiders that are more adorable than scary. They are quick to make and a guaranteed hit at parties or family gatherings.
Why You’ll Love This Spooky Peanut Butter Spider Cookies Recipe
These cookies are festive, delicious, and surprisingly simple to prepare. Here is why you will love them:
- ⏱️ Quick and easy with simple ingredients
- 🍪 Soft, chewy cookies with a rich peanut butter flavor
- 🕷️ Fun and festive design perfect for Halloween parties
- 👩👩👧👦 Kid friendly and great for baking with little helpers
- 🔄 Easily customizable with different candies and decorations
Spooky Peanut Butter Spider Cookies Ingredients & Substitutions
- Peanut Butter Cookie Dough: Homemade or store bought. Sugar cookie dough can be used if you prefer non peanut butter cookies.
- Chocolate Peanut Butter Cups (mini size): Forms the spider body. You can substitute with chocolate truffles or malt balls.
- Chocolate Candy Melts or Chips: For spider legs. Melted dark chocolate also works.
- Candy Eyes: Essential for the spooky look. If unavailable, use mini white chocolate chips with dots of melted chocolate.
Substitutions:
- Use almond butter or sunflower seed butter cookie dough for a peanut free version.
- Try gluten free cookie dough for a GF friendly treat.
- Swap in colorful candies like M&Ms for a playful twist.
Step-by-Step Instructions to Make Spooky Peanut Butter Spider Cookies
- Preheat oven according to your cookie dough instructions. Line a baking sheet with parchment paper.
- Roll cookie dough into balls and place on the sheet. Bake until lightly golden.
- While still warm, gently press a mini peanut butter cup into the center of each cookie.
- Melt chocolate candy melts or chips. Use a piping bag or a zip top bag with the corner snipped to pipe legs coming out from the candy cup.
- Attach candy eyes to the peanut butter cup using a dot of melted chocolate.
- Let cookies cool completely until the chocolate hardens.
Tips for Success
- Press the peanut butter cup in while cookies are warm so it sticks well.
- Pipe thin, steady lines for legs to keep them neat.
- Chill cookies briefly to set the chocolate faster.
- Use parchment paper for easy cleanup.
Variations of Spooky Peanut Butter Spider Cookies
- Truffle Spiders: Use chocolate truffles for a fancier spider.
- Colorful Creepy Crawlers: Add orange or green candy melts for fun leg colors.
- No Bake Version: Use store bought cookies as the base and just decorate.
- Nut Free Option: Use sunflower seed butter cookies with chocolate bodies.
Serving Suggestions: What to Pair with Spooky Peanut Butter Spider Cookies
- Pair with a glass of cold milk for kids.
- Serve with hot cocoa or coffee for adults at parties.
- Add them to a Halloween dessert tray with brownies and popcorn.
Storage & Reheating Instructions
- Room Temperature: Store in an airtight container for up to 3 days.
- Refrigerator: Keeps well for up to 5 days.
- Freezer: Freeze undecorated cookies for up to 2 months, then decorate after thawing.
- Reheating: Not needed, best enjoyed at room temperature.
Memories Made Around the Table
The first time I made these cookies, my kids could not stop giggling as they helped place the candy eyes. It turned into a family tradition where we make a batch every October, and they love serving them to friends at Halloween parties.
FAQs
Can I make Spooky Peanut Butter Spider Cookies ahead of time?
Yes, bake the cookies and store them undecorated. Add the spider decorations the day of serving.
Do I need to use peanut butter cups?
No, chocolate truffles, malt balls, or any round candy can work as the spider body.
Can I make these cookies gluten free?
Yes, simply use gluten free cookie dough and check that your candy ingredients are GF.
Final Thoughts & Printable Recipe
Spooky Peanut Butter Spider Cookies are a fun and delicious way to celebrate Halloween. They are simple to make, festive to serve, and loved by kids and adults alike. Try them this season, and do not forget to pin or share the recipe so others can enjoy this creepy crawly treat too.
Spooky Peanut Butter Spider Cookies
Equipment
- Baking Sheet
- Parchment Paper
- Microwave-safe Bowl
- Piping Bag or Zip-top Bag
- Oven
Ingredients
Main Ingredients
- 1 batch peanut butter cookie dough homemade or store-bought
- 24 mini chocolate peanut butter cups for spider bodies
- ½ cup chocolate chips or candy melts melted for spider legs
- 48 candy eyes 2 per cookie
Instructions
- Preheat the oven according to the cookie dough instructions. Line a baking sheet with parchment paper.
- Roll cookie dough into balls and place on the baking sheet. Bake until lightly golden, about 8–10 minutes.
- While cookies are still warm, gently press a mini peanut butter cup into the center of each cookie.
- Melt the chocolate chips or candy melts. Transfer to a piping bag or zip-top bag with the corner snipped.
- Pipe 8 legs around each candy to create the spider effect.
- Attach two candy eyes to each peanut butter cup using small dots of melted chocolate.
- Let cookies cool completely until the chocolate is set. Serve and enjoy!