If you love bakery perfect decorated sugar cookies, this is your trusty royal icing. It dries crisp, floods silky smooth, and holds gorgeous detail without being chalky. I will show you the exact ratios, consistencies, and pro tricks that make cookie decorating feel easy.
Whether you are outlining, flooding, or adding delicate details, this reliable icing mixes in minutes and dries beautifully every time.
Royal Icing for Cookies: Foolproof Recipe + Tips
Equipment
- 1 Mixing Bowl
- 1 Electric Mixer hand or stand
- 1 Fine-mesh sieve or sifter
- 1 Rubber spatula
- 1 Piping bags
- 1 Piping tips round tips for outline and flood
- 1 Scribe tool or toothpick
- 1 Spray bottle for precise thinning (optional)
- 1 Small fan or dehydrator to speed drying (optional)
Ingredients
Royal Icing
- 4 cups powdered sugar sifted
- 3 tbsp meringue powder
- 6 tbsp water room temperature; start with 6 to 8 tbsp, plus more to thin
- 1 tsp vanilla or almond extract water-based, oil-free
- 1 tsp light corn syrup optional, for gentle shine and softer bite
- fine sea salt pinch to balance sweetness
Instructions
Gather and Degrease Equipment
- Wipe your mixing bowl, beaters, spatulas, and tips with a little vinegar or lemon juice, then dry well. Any grease or oil can weaken royal icing.
Sift and Combine Dry Ingredients
- Sift powdered sugar and meringue powder into the bowl to eliminate lumps. Add the salt and whisk to distribute evenly.
Add Water and Beat to Stiff Peaks
- Add 6 tbsp water to start and the extract. Mix on low until moistened, scraping the bowl. Increase to medium and beat 2 to 3 minutes until thick, glossy, and stiff peaks just form. Do not overbeat or you will trap excess air.
Adjust Consistency: Stiff, Medium, Flood
- Thin slowly with water to your target consistency:
- Stiff (detail/flowers): a spoon pulled through leaves a trench that does not fill in.
- Medium (outlining/general piping): surface smooths in about 20 seconds.
- Flood (filling): settles in about 10–12 seconds.
Color and Flavor
- Divide icing into bowls. Tint with gel or powdered food color a tiny amount at a time. Deep colors intensify as they rest, so start lighter. Add a touch of white gel to brighten pastels.
Rest, De-bubble, and Bag
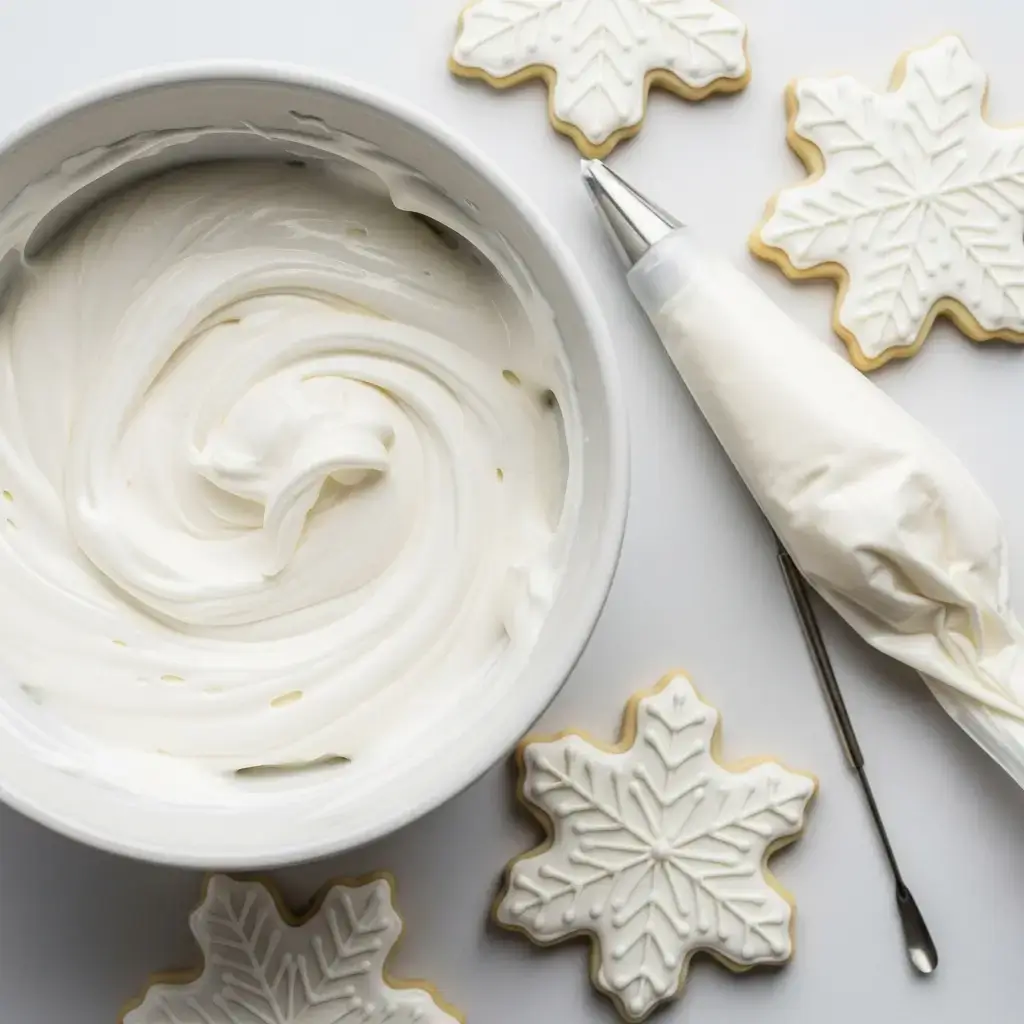
- Cover bowls with plastic wrap touching the surface and rest 10 minutes. Gently stir to bring bubbles to the top and pop them. Transfer to piping bags fitted with tips, keeping bags covered with a damp towel while you work.
Decorate and Dry Fully
- Outline with medium icing, flood with flood consistency, then use a scribe to nudge icing to edges and pop bubbles. Dry cookies on trays at room temperature with good air circulation for 6 to 8 hours or overnight. A small fan on low helps prevent craters.
Notes
Why You’ll Love This Royal Icing for Cookies
- Silky smooth finish that dries firm yet bites pleasantly
- Easy to customize consistencies for outline, flood, and details
- Uses pantry ingredients and mixes up fast
- Colors like a dream with gel food coloring
- Make ahead friendly for stress free decorating
Royal Icing for Cookies Ingredients & Substitutions
- 4 cups powdered sugar, sifted (about 480 g)
- 3 tbsp meringue powder (about 27 g)
- 6 to 8 tbsp room temperature water, plus more to thin
- 1 tsp vanilla or almond extract, water based and oil free
- 1 tsp light corn syrup, optional for gentle shine and softer bite
- Pinch fine sea salt to balance sweetness
Substitutions and notes:
- No meringue powder: use 2 large pasteurized egg whites (about 60 g). Start with 2 to 4 tbsp water, then thin as needed. Add 1 tsp lemon juice for brightness.
- Flavor swaps: try clear vanilla, almond, lemon, or bakery emulsions that are water based. Avoid oil based extracts which can prevent the icing from setting.
- Shine and softness: a small amount of corn syrup adds gentle gloss and a tender bite without compromising dry time.
- Dairy free and gluten free: naturally both, as long as flavorings are oil free and certified gluten free if needed.
Step-by-Step Instructions to Make Royal Icing for Cookies
Gather and Degrease Equipment
Wipe your mixing bowl, beaters, spatulas, and tips with a little vinegar or lemon juice, then dry well. Any grease or oil can weaken royal icing.
Sift and Combine Dry Ingredients
Sift powdered sugar and meringue powder into the bowl to eliminate lumps. Add the salt and whisk to distribute evenly.
Add Water and Beat to Stiff Peaks
Add 6 tbsp water to start and the extract. Mix on low until moistened, scraping the bowl. Increase to medium and beat 2 to 3 minutes until thick, glossy, and stiff peaks just form. Do not overbeat or you will trap excess air.
Adjust Consistency: Stiff, Medium, Flood
- Stiff for detail and flowers: add a little powdered sugar if needed. A spoon pulled through should leave a trench that does not fill in.
- Medium for outlining and general piping: thin with water a few drops at a time until the surface smooths in about 20 seconds.
- Flood for filling: thin until it settles in about 10 to 12 seconds. Always thin slowly to avoid overshooting.
Tip: Use a spray bottle to add water a little at a time for precision.
Color and Flavor
Divide icing into bowls. Tint with gel or powdered food color, a tiny amount at a time. Deep colors intensify as they rest, so start lighter than you want. Add a touch of white gel to brighten pastels.
Rest, De-bubble, and Bag
Cover bowls with plastic wrap touching the surface and rest 10 minutes. Gently stir to bring bubbles to the top and pop them. Transfer to piping bags fitted with tips, keeping bags covered with a damp towel while you work.
Decorate and Dry Fully
Outline with medium icing, flood with flood consistency, then use a scribe to nudge icing to edges and pop bubbles. Dry cookies on trays at room temperature with good air circulation for 6 to 8 hours or overnight. A small fan set on low helps prevent craters.
Tips for Success
- Work oil free: even a hint of grease from bowls, butter based cookies, or oil based extracts can soften icing.
- Thin slowly: water is powerful. Add by the drop and test the 10 to 20 second rule for consistency.
- Color ahead: mix colors and let them sit 30 minutes for true shades, then adjust.
- Avoid overmixing: beat only to glossy peaks to minimize air bubbles.
- Use a dehydrator or fan: gentle airflow speeds setting and reduces craters on dots and sections.
Variations of Royal Icing for Cookies
- Lemon vanilla: use half vanilla and half lemon juice for a fresh finish.
- Almond bakery style: clear vanilla plus almond extract gives classic cookie shop flavor.
- Spiced: whisk in 0.5 tsp cinnamon or pumpkin pie spice to the powdered sugar for cozy notes.
- Chocolate: replace 2 tbsp powdered sugar with 2 tbsp cocoa powder and thin slightly.
- Dairy free vegan: whip 6 tbsp aquafaba with 500 g powdered sugar and 0.25 tsp cream of tartar. It sets a bit softer but pipes beautifully.
Serving Suggestions: What to Pair with Royal Icing for Cookies
- Classic sugar cookies, vanilla bean shortbread, or gingerbread men
- Gingerbread houses and holiday cut outs
- Hot cocoa, spiced chai, coffee, or milk for dunking
- Edible gift boxes tied with ribbon for birthdays or holidays
Storage & Reheating Instructions
- Short term: keep icing covered with plastic wrap touching the surface, then lid on the container. At room temp, meringue powder icing keeps 1 to 2 weeks.
- With pasteurized egg whites: refrigerate up to 3 days.
- Freezing: freeze in airtight containers or sealed piping bags up to 3 months. Thaw overnight in the fridge, then bring to room temp.
- To revive: stir slowly to reemulsify, spritz in water a few drops at a time to reach your target consistency. No reheating needed.
- Decorated cookies: once fully dry, store layers between parchment in an airtight tin up to 1 week or freeze up to 2 months.
Memories Made Around the Table
Every December my kitchen turns into a sprinkle covered studio. We set out bowls of tinted icing, a little fan humming, and a stack of plain sugar cookies ready for creativity. The best part is always the final reveal the next morning, when everyone rushes in to see their glossy, set designs.
FAQs
Can I use liquid food coloring? You can, but it thins icing quickly. Use gel colors for vibrant shades and better control. If you use liquid, add more powdered sugar as needed.
Why does my icing crater or bubble? Overmixing and trapped air are common causes. Rest the icing 10 minutes, stir gently, pop bubbles with a scribe, and use a fan while drying.
How long does royal icing take to dry? Typically 6 to 8 hours at room temperature, or overnight for safest handling. Humid weather may require extra time or a dehydrator on low.
Is it safe for kids? Yes when made with meringue powder or pasteurized egg whites. Avoid raw, unpasteurized eggs.
Can I flavor with citrus zest or oils? Avoid oil based extracts and heavy zest which carry oils that can soften icing. Choose water based extracts or bakery emulsions instead.
Final Thoughts
This royal icing for cookies gives you crisp edges, smooth floods, and clean details with minimal fuss. Mix it once, color it beautifully, and let your cookies shine. You have got this.