

I love how the house feels during the holidays, filled with the scent of chocolate and the sound of Christmas carols playing in the background. Every year, I look for simple treats that double as festive decor, and these ornaments are always the highlight of our dessert table. They are incredibly easy to make, look professional on a platter, and bring so much joy to everyone who takes a bite. I find that these little sweets are the perfect way to get into the holiday spirit without spending the entire day in the kitchen.
Recipe Details
Recipe Information
- Prep Time: 30 minutes
- Cook Time: 0 minutes
- Total Time: 50 minutes
- Servings: 24 ornaments
- Difficulty: Easy
Nutrition Information (Per Serving)
- Calories: 185
- Protein: 2g
- Carbs: 22g
- Fat: 10g
Why You’ll Love This Oreo Cookie Christmas Ornaments
This recipe is a holiday favorite because it requires absolutely no baking, making it a stress free option during the busy Christmas season. The combination of creamy chocolate and crunchy cookie is a crowd pleaser for both kids and adults alike. You will love how customizable they are, allowing you to use different colors and patterns to match your holiday theme. Plus, they make wonderful handmade gifts for neighbors or teachers when packaged in a pretty tin.
Oreo Cookie Christmas Ornaments Ingredients & Substitutions
- 1 package (14.3 ounces) chocolate sandwich cookies
- 1 package (8 ounces) cream cheese, softened to room temperature
- 16 ounces white chocolate melting wafers or almond bark
- 1 teaspoon alcohol-free vanilla extract
- 24 small chocolate peanut butter cups or miniature caramel cups
- 24 small pretzel loops or curved pretzel pieces
- Red, green, and gold sprinkles for decorating
- 1 tablespoon coconut oil, optional for thinning chocolate
If you prefer a different flavor, you can swap the chocolate sandwich cookies for golden vanilla or peppermint versions. For the coating, dark or milk chocolate can be used instead of white chocolate if you want a more traditional truffle look. If you do not have pretzels for the ornament hanger, a small piece of licorice or a curved candy cane piece works beautifully as a substitute. For a dairy free alternative, use plant based cream cheese and dairy free chocolate chips with a touch of coconut oil.
Step-by-Step Instructions to Make Oreo Cookie Christmas Ornaments
Step 1: Crush the Cookies
Place the chocolate sandwich cookies into a food processor and pulse until they are turned into fine crumbs. You want to make sure there are no large chunks left so the ornaments have a smooth texture. If you do not have a food processor, place the cookies in a sealed plastic bag and crush them with a rolling pin.
Step 2: Create the Cookie Dough
In a large mixing bowl, combine the cookie crumbs with the softened cream cheese and the alcohol-free vanilla extract. Use a hand mixer or a sturdy spatula to blend them together until a uniform, dark dough forms. The mixture should be thick and hold its shape when pressed together.
Step 3: Roll the Ornaments
Scoop out about one tablespoon of the mixture at a time and roll it between your palms to form a smooth ball, approximately one inch in diameter. Place each ball onto a baking sheet lined with parchment paper. Repeat this process until all the dough has been used.
Step 4: Chill the Centers
Place the baking sheet in the freezer for about 20 minutes. Chilling the balls is a crucial step because it helps them hold their shape and prevents them from melting when you dip them into the warm chocolate coating later.
Step 5: Melt the Coating
While the cookie balls are chilling, melt the white chocolate wafers in a microwave safe bowl in 30 second intervals. Stir well between each interval until the chocolate is completely smooth. If the chocolate is too thick, stir in a teaspoon of coconut oil to thin it out to a dipping consistency.
Step 6: Dip and Decorate
Using a fork or a dipping tool, submerge each chilled cookie ball into the melted chocolate. Lift it out and let the excess chocolate drip off before placing it back on the parchment paper. Immediately place a small chocolate cup on top to act as the ornament cap and gently press a pretzel loop into the cup to serve as the hanger. Add your favorite holiday sprinkles before the chocolate sets.
Tips for Success
To ensure your ornaments look their best, make sure the cream cheese is truly at room temperature before mixing, which prevents lumps in your dough. When dipping, work in small batches so the chocolate stays warm and fluid. If the cookie balls start to get soft while you are working, simply pop them back in the freezer for a few minutes. For the neatest finish, use a toothpick to help slide the dipped ball off the fork and onto the parchment paper without leaving marks.
Variations of Oreo Cookie Christmas Ornaments
You can get very creative with this recipe by changing the exterior colors. Use food coloring specifically designed for chocolate to tint the white chocolate into bright reds, blues, or greens. For a more sophisticated look, skip the sprinkles and drizzle the finished ornaments with contrasting melted chocolate. You could also mix a half teaspoon of peppermint extract into the dough for a refreshing holiday twist that tastes just like a candy cane.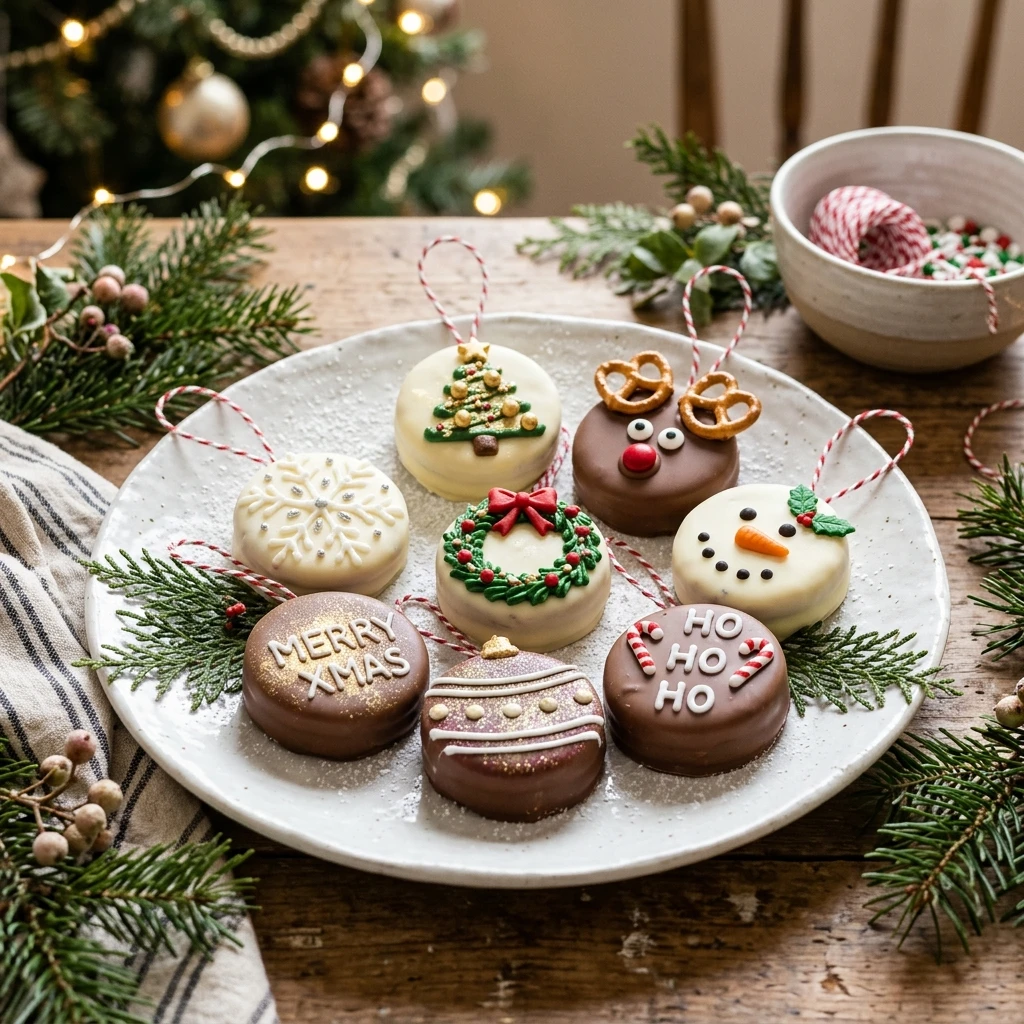
Serving Suggestions: What to Pair with Oreo Cookie Christmas Ornaments
These festive treats are a wonderful addition to a larger Christmas cookie platter alongside gingerbread men and sugar cookies. They also pair perfectly with a hot cup of cocoa or a warm mug of spiced cider. If you are hosting a holiday party, serve them on a silver tray with some fresh cranberries and evergreen sprigs for a beautiful, edible centerpiece. They are quite rich, so serving them with a few slices of tart apple can provide a nice balance to the sweetness.
Storage & Reheating Instructions
Because these ornaments contain cream cheese, they must be stored in the refrigerator. Place them in an airtight container with layers of parchment paper between them to prevent sticking. They will stay fresh and delicious for up to one week. If you want to prepare them further in advance, you can freeze the finished ornaments for up to two months. Simply thaw them in the refrigerator for a few hours before serving. Reheating is not recommended as it will melt the chocolate coating.
Memories Made Around the Table
I remember making these with my nieces last year and the kitchen was a total mess of sprinkles and laughter. We spent the whole afternoon competing to see who could make the most elaborate ornament design. It is one of those traditions that makes the holiday feel special without the stress of hours at the oven. Every time I see a plate of these, I am reminded of those quiet, happy moments shared with family while the snow fell outside.
FAQs
Can I make these ornaments ahead of time?
Yes, you can definitely make these a few days in advance. They hold up very well in the refrigerator for about a week. This makes them an excellent choice for holiday meal prep or for bringing to a party where you want to have the dessert ready to go.
What is the best way to melt the chocolate smoothly?
The key to smooth chocolate is low and slow heat. Always microwave in short bursts and stir thoroughly. If you find the chocolate is becoming thick or grainy, adding a tiny amount of vegetable oil or coconut oil can help restore that silky texture you need for dipping.
Do I have to use a food processor for the cookies?
While a food processor is the fastest way to get a fine crumb, it is not strictly necessary. You can put the cookies in a heavy duty freezer bag and crush them with a rolling pin or a heavy pan. Just make sure to get them as fine as possible so the truffles are easy to roll.
How do I keep the cookie balls from falling off the fork while dipping?
The best trick is to make sure the balls are very cold before you start. If they are firm, they will stay on the fork much easier. You can also use a dedicated chocolate dipping tool which has thinner tines than a standard kitchen fork.
Can I use low fat cream cheese for this recipe?
I recommend using full fat cream cheese for the best flavor and consistency. Low fat versions often have a higher water content, which can make the cookie mixture too soft and difficult to roll into stable balls. The full fat version provides the rich, cheesecake like flavor that makes these so delicious.
Final Thoughts
These Oreo Cookie Christmas Ornaments are the perfect blend of simple preparation and impressive presentation. They bring a touch of whimsy to any holiday gathering and are sure to be the first thing to disappear from the dessert table. Whether you are making them with children or preparing a batch for a holiday gift, the process is just as enjoyable as the result. Enjoy the process of decorating and the sweet memories you will create while making these festive treats.


Oreo Cookie Christmas Ornaments
- Total Time: 50 minutes
Ingredients
- 1 package (14.3 ounces) chocolate sandwich cookies
- 1 package (8 ounces) cream cheese, softened to room temperature
- 16 ounces white chocolate melting wafers or almond bark
- 1 teaspoon alcohol-free vanilla extract
- 24 small chocolate peanut butter cups or miniature caramel cups
- 24 small pretzel loops or curved pretzel pieces
- Red, green, and gold sprinkles for decorating
- 1 tablespoon coconut oil, optional for thinning chocolate
Instructions
- Place the chocolate sandwich cookies into a food processor and pulse until they are turned into fine crumbs. You want to make sure there are no large chunks left so the ornaments have a smooth texture. If you do not have a food processor, place the cookies in a sealed plastic bag and crush them with a rolling pin.
- In a large mixing bowl, combine the cookie crumbs with the softened cream cheese and the alcohol-free vanilla extract. Use a hand mixer or a sturdy spatula to blend them together until a uniform, dark dough forms. The mixture should be thick and hold its shape when pressed together.
- Scoop out about one tablespoon of the mixture at a time and roll it between your palms to form a smooth ball, approximately one inch in diameter. Place each ball onto a baking sheet lined with parchment paper. Repeat this process until all the dough has been used.
- Place the baking sheet in the freezer for about 20 minutes. Chilling the balls is a crucial step because it helps them hold their shape and prevents them from melting when you dip them into the warm chocolate coating later.
- While the cookie balls are chilling, melt the white chocolate wafers in a microwave safe bowl in 30 second intervals. Stir well between each interval until the chocolate is completely smooth. If the chocolate is too thick, stir in a teaspoon of coconut oil to thin it out to a dipping consistency.
- Using a fork or a dipping tool, submerge each chilled cookie ball into the melted chocolate. Lift it out and let the excess chocolate drip off before placing it back on the parchment paper. Immediately place a small chocolate cup on top to act as the ornament cap and gently press a pretzel loop into the cup to serve as the hanger. Add your favorite holiday sprinkles before the chocolate sets.
- Cook Time: 50 minutes
- Diet: Vegetarian