
Homemade Oreo Balls are the little bites everyone reaches for first. They are rich, chocolatey, and so simple that even busy weeknights can handle them. I tested a few coatings and tips so yours turn out glossy and irresistible every time.
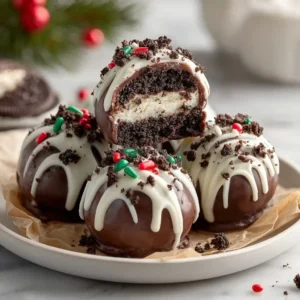
Homemade Oreo Balls
Equipment
- 1 Food Processor
- 1 Rolling Pin (optional)
- 1 Mixing Bowl
- 1 Parchment Paper for lining
- 1 Baking Sheet
- 1 Microwave-safe Bowl
- 1 Fork for dipping
- 1 Small cookie scoop or rounded teaspoon
Ingredients
Oreo Balls
- 36 cookies chocolate sandwich cookies original or double-stuffed; gluten-free works
- 8 oz cream cheese softened to room temperature
- 12 oz chocolate melting wafers or chopped chocolate semi-sweet or dark; white chocolate optional for contrast
- 1 teaspoon coconut oil or neutral oil optional; helps thin chocolate
- 0.25 teaspoon alcohol-free vanilla extract optional; a few drops
- Toppings optional: crushed cookies, sprinkles, flaky salt, or contrasting chocolate drizzle
Instructions
Make the Oreo Balls
- Add cookies to a food processor and pulse to fine crumbs (no big bits). If using a bag and rolling pin, crush thoroughly to a sand-like texture.
- In a bowl, combine cookie crumbs with softened cream cheese and a few drops of alcohol-free vanilla if using. Mix until evenly combined and dough-like with no streaks.
- Use a small cookie scoop to portion, then roll between your palms into smooth balls. Place on a parchment-lined sheet.
- Refrigerate 20 to 30 minutes until firm. This helps them hold shape for dipping.
- Melt chocolate in a microwave-safe bowl in 20 to 30 second bursts, stirring between each. Stir in a tiny splash of oil if needed until glossy and pourable.
- Use a fork to dip each ball, tap off excess, then set back on parchment. Add sprinkles, crushed cookies, or drizzle with contrasting chocolate before the coating sets.
- Refrigerate 10 to 15 minutes until the chocolate is firm. Enjoy chilled or slightly cool.
Storage
- Refrigerator: Store in an airtight container up to 5 days (separate layers with parchment). Freezer: Freeze on a sheet pan until solid, then transfer to a container for up to 2 months. Thaw in the fridge. No reheating needed.
Notes
Why You’ll Love This Homemade Oreo Balls
- 3 ingredients, no oven, big flavor.
- Perfect make-ahead treat for parties, bake sales, or gifting.
- Customizable with sprinkles, crushed cookies, or a pretty drizzle.
- Kid-friendly to make and to eat.
Homemade Oreo Balls Ingredients & Substitutions
- Chocolate sandwich cookies: Classic chocolate-and-cream cookies work best. Use original or double-stuffed. Gluten-free sandwich cookies work too.
- Cream cheese: Softened to room temp for easy mixing. Neufchâtel or dairy-free cream cheese can be used; drain any excess moisture first.
- Chocolate for dipping: Semi-sweet or dark chocolate melts show off the cookies’ flavor. White chocolate is lovely for contrast.
- Coconut oil or neutral oil (optional): A tiny amount helps thin the melted chocolate for a smoother dip.
- Alcohol-free vanilla (optional): A few drops deepen the cookies-and-cream vibe.
- Toppings (optional): Crushed cookies, sprinkles, flaky salt, or a contrasting chocolate drizzle.
Step-by-Step Instructions to Make Homemade Oreo Balls
Step 1: Crush the cookies
Add cookies to a food processor and pulse to fine crumbs. No big bits. If using a bag and rolling pin, really go for a sand-like texture.
Step 2: Make the mixture
In a bowl, combine cookie crumbs with softened cream cheese and a few drops of alcohol-free vanilla if using. Mix until evenly combined and dough-like with no streaks.
Step 3: Scoop and roll
Use a small cookie scoop to portion, then roll between your palms into smooth balls. Place on a parchment-lined sheet.
Step 4: Chill
Refrigerate 20 to 30 minutes until firm. This helps them hold shape for dipping.
Step 5: Melt the chocolate
Melt chocolate in a microwave-safe bowl in 20 to 30 second bursts, stirring between each. Stir in a tiny splash of oil if needed until glossy and pourable.
Step 6: Dip and decorate
Use a fork to dip each ball, tap off excess, then set back on parchment. Add sprinkles, crushed cookies, or drizzle with contrasting chocolate before the coating sets.
Step 7: Set and serve
Refrigerate 10 to 15 minutes until the chocolate is firm. Enjoy chilled or slightly cool.
Tips for Success
- Fine crumbs are key: Large chunks prevent a smooth truffle texture.
- Soften the cream cheese: Cold cream cheese leads to streaks and overmixing.
- Chill before dipping: Firm centers make cleaner, prettier dips.
- Thin the chocolate lightly: A small splash of oil creates a smooth shell that sets with shine.
- Work in batches: Keep half the balls chilling while you dip the rest.
Variations of Homemade Oreo Balls
- Double chocolate: Use dark chocolate cookies and dark chocolate coating.
- Black and white: Dip in white chocolate and drizzle with dark chocolate.
- Mint twist: Add a drop of alcohol-free peppermint extract and top with crushed mint candies.
- Nutty swirl: Mix a spoonful of peanut butter with the cream cheese for a peanut butter cup vibe.
- Festive finish: Use colored sprinkles to match holidays or school colors.
Serving Suggestions: What to Pair with Homemade Oreo Balls
- A platter with fresh berries for a pop of brightness.
- Hot coffee, tea, or cold milk to balance the richness.
- A dessert board with pretzels, fruit, and assorted truffles.
Storage & Reheating Instructions
- Refrigerator: Store in an airtight container up to 5 days. Keep layers separated with parchment.
- Freezer: Freeze on a sheet pan until solid, then transfer to a bag or container for up to 2 months. Thaw in the fridge for best texture.
- Reheating: No reheating needed. Serve chilled or let sit 5 minutes at room temp for a softer bite.
Memories Made Around the Table
These were the first treats my niece helped me roll, and we both giggled at our chocolatey hands. Now they are the dessert request at every family game night, proof that simple can be special.
FAQs
Can I make these without a food processor?
Yes. Seal cookies in a sturdy bag and crush with a rolling pin until very fine. Take your time so the mixture sets smoothly.
What if my chocolate is thick or streaky?
Stir in a small splash of neutral oil and keep the bowl warm. Dip quickly and tap off excess for an even coat.
Can I use a different filling than cream cheese?
Use Neufchâtel or a dairy-free cream cheese. If very soft, chill the mixture longer before rolling.
Do these need to be refrigerated?
Yes. Because of the cream cheese, keep them chilled until serving. They can sit out briefly for a party spread.
Final Thoughts
Homemade Oreo Balls deliver big bakery-style charm with almost no effort. Keep a batch in the fridge or freezer, and you will always have a sweet little bite ready to share.