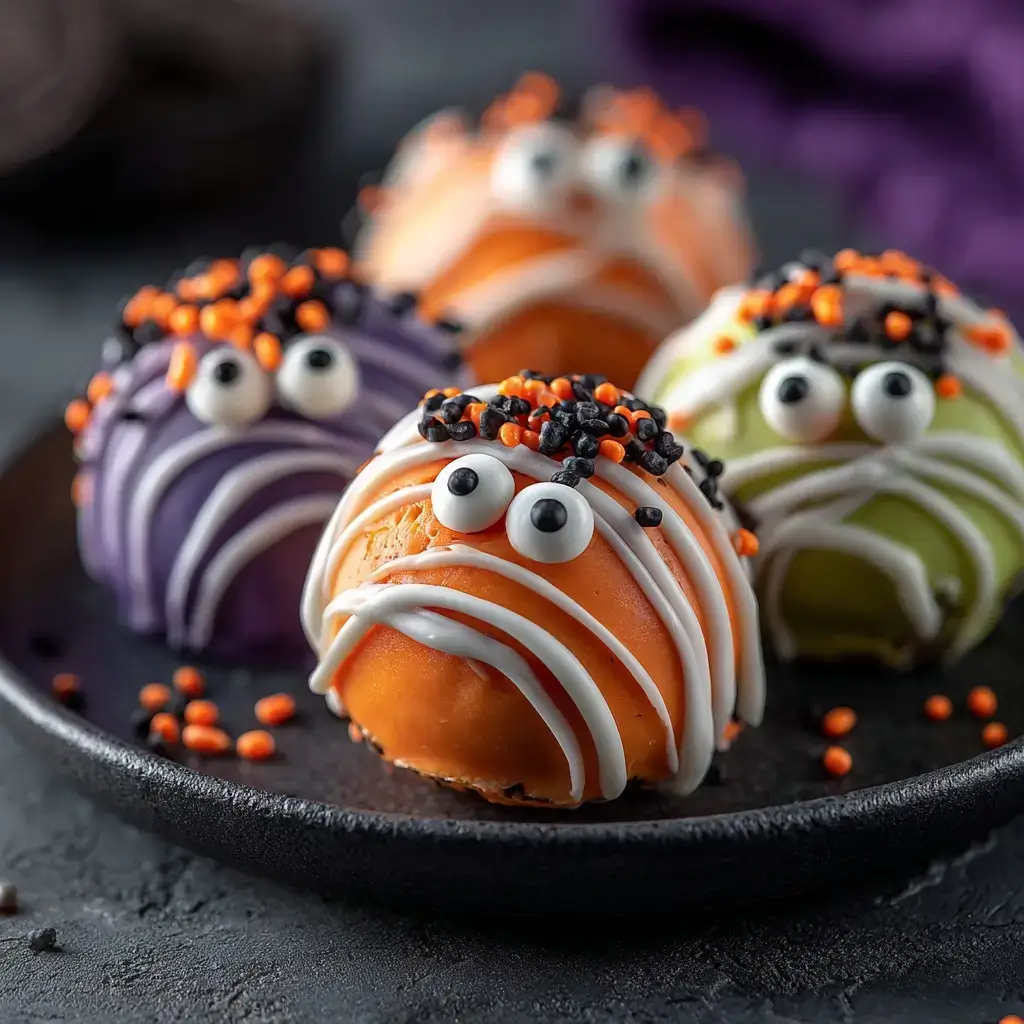
Halloween Oreo Balls are my go-to spooky sweet: fudgy Oreo truffles dipped in colorful candy melts, dotted with candy eyes, and gone in a flash. They are easy, no-bake, and perfect for letting kids help decorate.
Why You’ll Love This Halloween Oreo Balls
- No-bake and beginner friendly with big bakery-style results.
- Minimal ingredients you probably have on hand.
- Festive and customizable with colors, sprinkles, and candy eyes.
- Make ahead friendly for stress-free party prep.
- Creamy, fudgy centers with a satisfying candy shell.
Halloween Oreo Balls Ingredients & Substitutions
- Oreo cookies: 36 cookies from a 14.3 oz package (about 405 g). Any chocolate sandwich cookie works. Use gluten-free sandwich cookies for GF.
- Cream cheese: 8 oz (226 g) block, softened. Use brick style for best texture. Dairy-free cream cheese works too.
- Candy melts: 12 to 16 oz total in orange, black, white, or purple. White chocolate or almond bark also works, but melts thicker.
- Coconut oil or cocoa butter: 1 to 2 teaspoons to thin melted coating if needed. Neutral oil also works.
- Candy eyes and Halloween sprinkles: for decorating. Mini M&M’s, crushed cookies, or colored sanding sugar are fun swaps.
- Vanilla and a pinch of salt: optional, to round out the flavor.
Step-by-Step Instructions to Make Halloween Oreo Balls
Crush the Oreos
Add cookies to a food processor and pulse to fine crumbs. No processor? Seal in a zip-top bag and crush with a rolling pin until sandy.
Make the truffle base
Beat softened cream cheese until smooth, then mix in Oreo crumbs, vanilla, and a tiny pinch of salt. The mixture should look like thick brownie batter and easily hold together.
Scoop and roll
Use a 1 tablespoon scoop to portion 30 to 36 balls. Roll between your palms until smooth. Place on a parchment-lined sheet.
Chill until firm
Refrigerate 20 to 30 minutes or freeze 10 minutes. Cold centers make dipping cleaner and help prevent cracks.
Melt the coating
Microwave candy melts in a dry bowl at 50 percent power in 30 second bursts, stirring between each. Add 1 teaspoon oil if needed for a smooth, fluid dip. Avoid water contact to prevent seizing.
Dip and decorate
Drop a chilled ball into melted coating. Lift with a fork, tap off excess, and slide onto parchment. Add candy eyes and sprinkles while wet. Repeat with different colors for a mix-and-match platter.
Set and share
Let the coating firm at room temperature for 20 minutes or refrigerate 10 minutes. Once set, drizzle contrasting colors for mummies and monsters.
Tips for Success
- Use brick cream cheese, not tub style, for a firm truffle.
- Keep the centers cold. If they soften, pop back in the fridge before dipping.
- Thin thick coatings with 1 teaspoon oil at a time until pourable.
- Decorate immediately after dipping so sprinkles and eyes stick.
- Work in small batches so the coating stays fluid and the balls stay cold.
- For clean bottoms, let excess drip off the fork, then nudge onto parchment with a toothpick.
Variations of Halloween Oreo Balls
- Mummy truffles: Dip in white, then drizzle thin white lines and add two candy eyes.
- Pumpkin patch: Dip in orange, pipe a green vine with melted green candy, and press a pretzel stem on top.
- Monster mash: Dip in purple or lime green, add one big eye for cyclops vibes, finish with colorful jimmies.
- Graveyard bites: Dip in dark chocolate, top with crushed Oreos for dirt and a mini cookie tombstone.
- Flavor twists: Use peanut butter Oreos, mint Oreos, or add 1 teaspoon peppermint or orange extract to the base.
- Allergy-friendly: Use gluten-free sandwich cookies and dairy-free cream cheese and melts.
Serving Suggestions: What to Pair with Halloween Oreo Balls
- Hot cocoa, spiced apple cider, or pumpkin cream cold brew.
- Arrange on a Halloween dessert board with caramel apples, popcorn, and pretzels.
- Package in mini cupcake liners for a tidy party platter or classroom treats.
- Set out with salty snacks like pretzels or kettle chips for a sweet-salty balance.
Storage & Reheating Instructions
Store Halloween Oreo Balls in an airtight container, layered with parchment, in the refrigerator up to 1 week. For parties, they can sit out up to 2 hours max since they contain cream cheese. Freeze up to 2 months in a freezer-safe container. Thaw overnight in the fridge, then bring to room temp for 10 minutes before serving. If the coating cracks, warm a little of the same color and patch with a small drizzle.
Memories Made Around the Table
Every October, my kids line up at the counter to place candy eyes at jaunty angles. Someone always makes a one-eyed monster, and it is always the first to disappear.
FAQs
- Do I need to remove the Oreo filling? No. The filling helps bind the crumbs and adds sweetness.
- Can I use white chocolate chips instead of candy melts? Yes, but chips melt thicker. Stir in 1 to 2 teaspoons oil and melt low and slow. Tempering gives the snappiest shell.
- Why are my Oreo balls cracking or weeping? Big temperature swings cause cracks and condensation. Keep centers cold, avoid freezing too hard, and let freshly dipped truffles set at cool room temp.
- Can I make Halloween Oreo Balls ahead? Absolutely. Dip up to 3 days in advance and refrigerate. Or freeze undipped balls for up to 2 months, then thaw, dip, and decorate.
- How can I color white chocolate? Use oil-based candy colors or pre-colored melts. Water-based gel colors can seize chocolate.
Final Thoughts
These Halloween Oreo Balls deliver maximum spooky fun with minimal effort. Whip up a batch, invite a few helpers, and watch the platter vanish.
Halloween Oreo Balls (No-Bake) with Candy Eyes
Equipment
- 1 Food Processor or zip-top bag to crush cookies
- 1 Rolling Pin (optional) for crushing in bag
- 1 Baking Sheet lined with parchment
- 1 Parchment Paper
- 1 Microwave-safe Bowl
- 1 Fork for dipping
- 1 Toothpick (optional) for nudging and drizzle details
Ingredients
Truffle Base
- 36 cookies Oreo cookies from a 14.3 oz package; any chocolate sandwich cookies work
- 8 oz cream cheese block, softened
- 1 teaspoon vanilla extract optional
- 1 pinch kosher salt optional
Coating & Decorations
- 12 oz candy melts assorted colors; use up to 16 oz as needed
- 1 teaspoon coconut oil (or cocoa butter) to thin coating as needed; add up to 2 teaspoons
- candy eyes for decorating
- Halloween sprinkles for decorating
Instructions
Crush the Oreos
- Add cookies to a food processor and pulse to fine crumbs. No processor? Seal in a zip-top bag and crush with a rolling pin until sandy.
Make the truffle base
- Beat softened cream cheese until smooth, then mix in Oreo crumbs, vanilla, and a tiny pinch of salt. The mixture should look like thick brownie batter and easily hold together.
Scoop and roll
- Use a 1 tablespoon scoop to portion 30 to 36 balls. Roll between your palms until smooth. Place on a parchment-lined sheet.
Chill until firm
- Refrigerate 20 to 30 minutes or freeze 10 minutes. Cold centers make dipping cleaner and help prevent cracks.
Melt the coating
- Microwave candy melts in a dry bowl at 50% power in 30-second bursts, stirring between each. Add 1 teaspoon oil if needed for a smooth, fluid dip. Avoid water contact to prevent seizing.
Dip and decorate
- Drop a chilled ball into melted coating. Lift with a fork, tap off excess, and slide onto parchment. Add candy eyes and sprinkles while wet. Repeat with different colors for a mix-and-match platter.
Set and share
- Let the coating firm at room temperature for 20 minutes or refrigerate 10 minutes. Once set, drizzle contrasting colors for mummies and monsters.