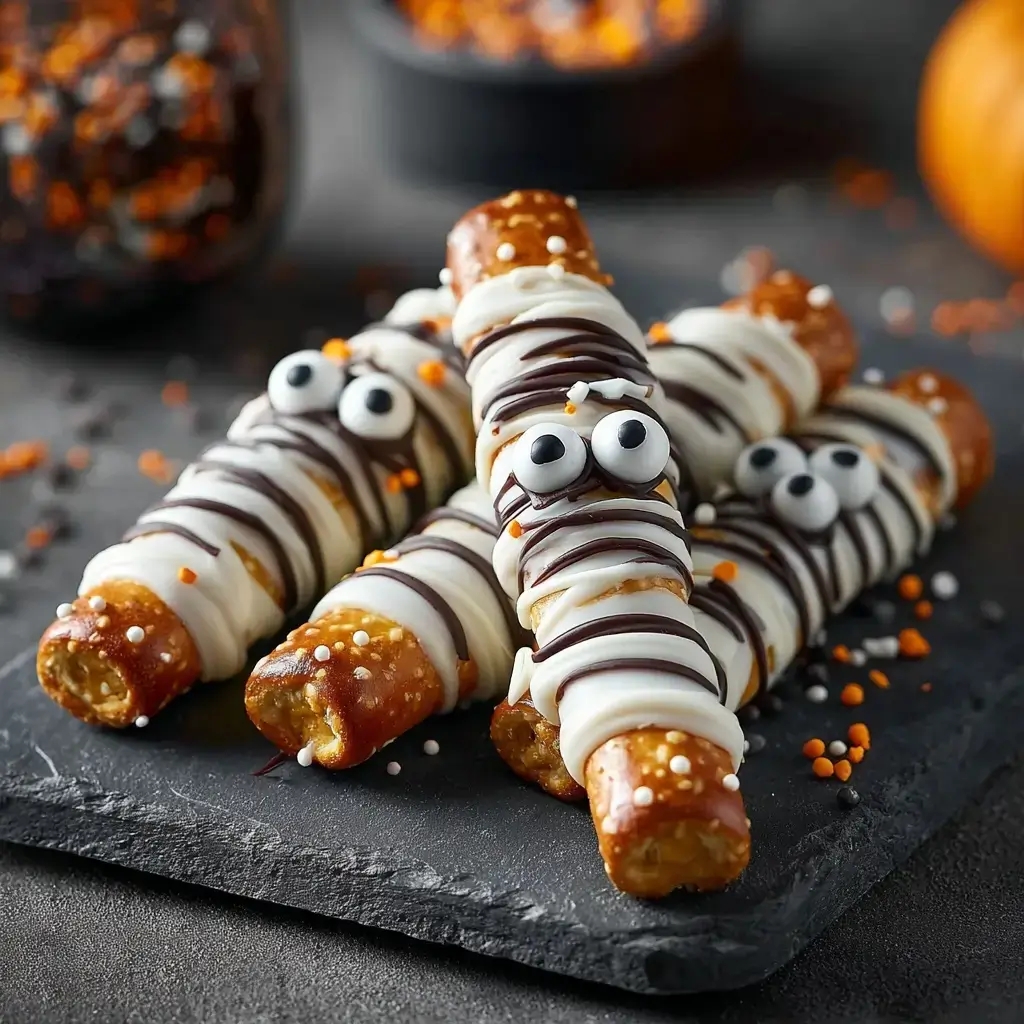
These Halloween Mummy Treats are the cute, crunchy, chocolatey bites that disappear from the party tray first. No baking, minimal mess, and loads of giggles when the candy eyes go on.
Why You’ll Love This Halloween Mummy Treats
- Quick no-bake treat perfect for last-minute Halloween parties.
- Kid-friendly and fun to decorate with simple pantry ingredients.
- Customizable with gluten free, dairy free, or different candy bases.
- Make-ahead friendly and travel well for school events or potlucks.
- Irresistible salty-sweet crunch with adorable spooky vibes.
Halloween Mummy Treats Ingredients & Substitutions
Makes about 20 mummy pretzel rods (or 36 mini pretzel mummies).
- 20 pretzel rods (or 6 cups mini pretzels). Use gluten free pretzels if needed.
- 12 oz white chocolate melting wafers or candy melts. Sub: almond bark or good-quality white chips.
- 1 to 2 tsp neutral oil (refined coconut or vegetable), optional to thin chocolate.
- 1 small bottle candy eyeballs.
- Optional: 1/4 cup semisweet chocolate chips for contrast drizzle or attaching eyes.
- Festive sprinkles, optional.
Equipment
- Parchment-lined sheet pan
- Microwave-safe bowl or double boiler
- Piping bag or small zip-top bag
- Fork or offset spatula
Step-by-Step Instructions to Make Halloween Mummy Treats
Prep the station
Line a sheet pan with parchment and set out your pretzels and candy eyes. If using a zip-top bag for drizzling, fold the top over a glass so it is easy to fill.
Melt the white chocolate
Microwave wafers in a dry bowl at 50 percent power in 30 second bursts, stirring between each until smooth. If thick, stir in 1/2 tsp oil at a time until fluid. Avoid water, which will seize the chocolate.
Dip the pretzels
Dip each pretzel rod about two thirds of the way into the melted chocolate, letting excess drip off. Lay on the parchment. For mini pretzels, dunk, lift with a fork, tap to remove excess, then place on parchment.
Add the eyes
While the coating is still wet, press two candy eyes near the top of each pretzel rod. For minis, place eyes toward the center. Gently wiggle to anchor.
Create the mummy bandages
Spoon remaining melted chocolate into a piping or zip-top bag and snip a tiny corner. Drizzle back and forth in thin ribbons over each pretzel to mimic bandages, partially covering the eyes so they peek through.
Set and serve
Let mummies firm at room temperature for 20 to 30 minutes, or chill 5 minutes if your kitchen is warm. Peel from parchment and arrange on a platter.
Tips for Success
- Melt low and slow. Use 50 percent microwave power and stir often for glossy results.
- Thin smartly. Add a few drops of neutral oil if needed, never water.
- Dry tools only. Any moisture can seize chocolate.
- Neat bandages. Let melted chocolate cool 2 minutes before drizzling for clean ribbons.
- Work in batches. Dip 5 to 6 pretzels, add eyes, then drizzle so nothing sets too fast.
- Humidity helper. If it is humid, set in the fridge briefly, then return to room temp before storing.
Variations of Halloween Mummy Treats
- Oreo Mummies: Dip sandwich cookies, add eyes, drizzle bandages.
- Rice Krispie Mummies: Cut bars into rectangles, dip the tops, add eyes, drizzle.
- Brownie Mummies: Pipe bandages over cooled brownie squares and stick on eyes with a dot of melted chocolate.
- Strawberry Mummies: Dry berries very well, dip in white chocolate, add eyes, drizzle. Best enjoyed same day.
- Spooky Colors: Tint a portion of white chocolate with oil-based candy color for pastel bandages.
Serving Suggestions: What to Pair with Halloween Mummy Treats
- Build a Halloween snack board with caramel corn, apple slices, cheddar cubes, and grapes.
- Pour mugs of hot apple cider, hot cocoa, or a pumpkin spice latte.
- Tuck a mummy rod into a cupcake as an easy edible topper.
- Wrap in cello bags with ribbon for classroom favors.
Storage & Reheating Instructions
- Room Temperature: Store in an airtight container layered with parchment for up to 2 weeks.
- Warm or Humid Climates: Refrigerate up to 10 days. Bring to room temp before serving to avoid condensation.
- Freezer: Freeze up to 1 month. Thaw overnight in the fridge, then bring to room temp uncovered. Some sugar bloom may occur but flavor stays great.
- Refreshing: If bandages scuff, re-drizzle a little melted chocolate and let set.
Memories Made Around the Table
When my kids were little, their favorite job was putting on the eyes. They would tilt each one just so, and suddenly every mummy had a personality. It is the kind of simple kitchen magic that makes Halloween feel extra special.
FAQs
Can I use almond bark or white chocolate chips?
Yes. Almond bark and candy melts are easiest. White chips work too, but add 1 to 2 tsp oil to help them melt smoothly.
Why did my chocolate turn thick or grainy?
It likely seized from moisture or overheated. Start over with a fresh bowl, melt at lower power, and keep tools completely dry.
How far ahead can I make these?
Up to 2 weeks at cool room temperature. For best texture, make 1 to 3 days before your event and store airtight.
Are these allergy friendly?
Use gluten free pretzels for GF. For dairy free, choose certified dairy free white baking chips or vegan candy melts and check candy eyes labels.
How do I color the bandages?
Use oil-based candy coloring. Water-based gels can cause chocolate to seize.
Final Thoughts
Halloween Mummy Treats are proof that simple ingredients can deliver maximum fun. Set out the toppings, invite little hands to help, and watch your spooky snack tray come to life.

Halloween Mummy Treats (Easy No-Bake Recipe)
Equipment
- 1 Parchment-lined sheet pan
- 1 Microwave-safe Bowl or double boiler
- 1 piping bag or small zip-top bag
- 1 Fork or offset spatula
Ingredients
Mummy Pretzels
- 20 pretzel rods or 6 cups mini pretzels; use gluten free pretzels if needed
- 12 oz white chocolate melting wafers or candy melts; sub almond bark or white chocolate chips
- 2 tsp neutral oil as needed to thin; refined coconut or vegetable; optional
- 1 small bottle candy eyeballs
- 0.25 cup semisweet chocolate chips optional, for contrast drizzle or attaching eyes
- Festive sprinkles optional
Instructions
Make the Mummy Treats
- Line a sheet pan with parchment and set out your pretzels and candy eyes. If using a zip-top bag for drizzling, fold the top over a glass so it is easy to fill.
- Microwave wafers in a dry bowl at 50 percent power in 30 second bursts, stirring between each until smooth. If thick, stir in 1/2 tsp oil at a time until fluid. Avoid water, which will seize the chocolate.
- Dip each pretzel rod about two thirds of the way into the melted chocolate, letting excess drip off. Lay on the parchment. For mini pretzels, dunk, lift with a fork, tap to remove excess, then place on parchment.
- While the coating is still wet, press two candy eyes near the top of each pretzel rod. For minis, place eyes toward the center. Gently wiggle to anchor.
- Spoon remaining melted chocolate into a piping or zip-top bag and snip a tiny corner. Drizzle back and forth in thin ribbons over each pretzel to mimic bandages, partially covering the eyes so they peek through.
- Let mummies firm at room temperature for 20 to 30 minutes, or chill 5 minutes if your kitchen is warm. Peel from parchment and arrange on a platter.

