
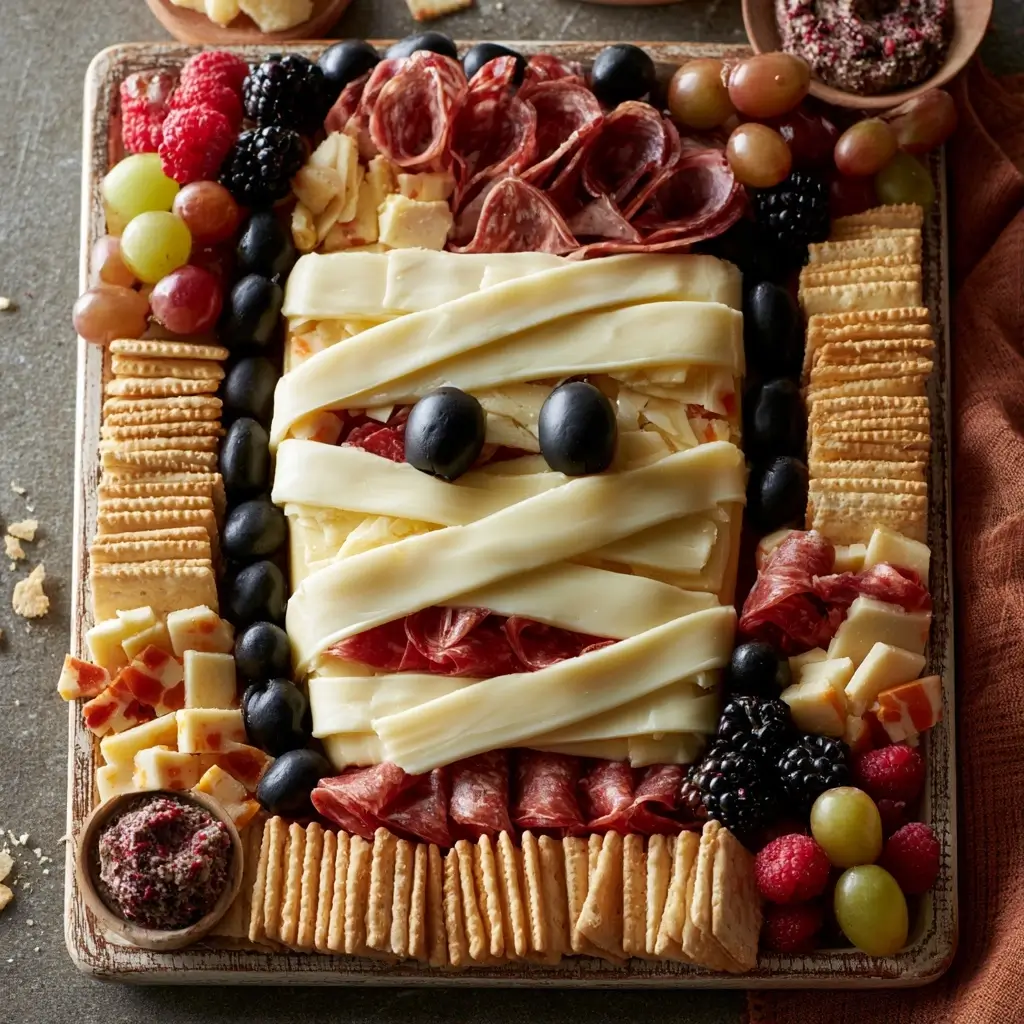
This mummy shaped charcuterie board is such a fun way to serve a snack spread for Halloween or any spooky themed gathering. It is playful, easy to assemble, and filled with simple bites that look festive without needing much prep.
Mummy Charcuterie Board
Equipment
- 1 Large board, tray, or platter
Ingredients
Board Ingredients
- Assorted cheeses, such as cheddar, mozzarella, and gouda
- Turkey slices or chicken slices
- Crackers or breadsticks
- Grapes, berries, and apple slices
- Hummus or cream cheese for spreading
- Olives for the eyes
- Cherry tomatoes or cucumber slices
- Roasted nuts or pretzels
- Fresh herbs for garnish
Instructions
- Start with a large board, tray, or platter that gives you enough room to shape the mummy design. A rectangular board works well, but any flat serving surface can look great.
- Arrange the main ingredients in the center of the board to form a body shape. Layer cheese, turkey slices, and crackers in a loose oval or rectangle so the board starts to take on a mummy look.
- Use strips of sliced cheese, thin turkey slices, or breadsticks to create the wrapped mummy lines. Overlap them a little so the board looks playful and slightly messy in a cute way.
- Leave a small open space near the top for the mummy face. Place two olive slices or small dots of cream cheese with tiny olive pieces inside to create the eyes.
- Surround the mummy shape with grapes, berries, apple slices, nuts, and crackers. Keep the colors balanced so the board feels full and festive without looking crowded.
- Add a few fresh herb sprigs around the edges for a polished look. Serve right away, or chill briefly until you are ready to bring it to the table.
Notes
Why You’ll Love This Mummy Charcuterie Board
This board turns everyday snacks into a centerpiece that feels special and inviting. It comes together quickly, uses easy-to-find ingredients, and gives you plenty of room to mix sweet and savory foods.
It is also a great option when you want something that looks impressive but does not require cooking a full recipe. You can make it as simple or as full as you like, depending on the size of your crowd.
Mummy Charcuterie Board Ingredients & Substitutions
Build your board with a mix of textures, colors, and shapes so the mummy design stands out.
- Assorted cheeses, such as cheddar, mozzarella, and gouda
- Turkey slices or chicken slices
- Crackers or breadsticks
- Grapes, berries, and apple slices
- Hummus or cream cheese for spreading
- Olives for the eyes
- Cherry tomatoes or cucumber slices
- Roasted nuts or pretzels
- Fresh herbs for garnish
For substitutions, use whatever fits your taste and what you already have. Swap the fruit for sliced pears or orange segments, use different cheeses, or add roasted chickpeas for extra crunch. If you want a more colorful board, include bell pepper strips or pomegranate seeds.
Step-by-Step Instructions to Make Mummy Charcuterie Board
1. Choose your board
Start with a large board, tray, or platter that gives you enough room to shape the mummy design. A rectangular board works well, but any flat serving surface can look great.
2. Place the mummy body
Arrange the main ingredients in the center of the board to form a body shape. Layer cheese, turkey slices, and crackers in a loose oval or rectangle so the board starts to take on a mummy look.
3. Add the wrapping effect
Use strips of sliced cheese, thin turkey slices, or breadsticks to create the wrapped mummy lines. Overlap them a little so the board looks playful and slightly messy in a cute way.
4. Make the face
Leave a small open space near the top for the mummy face. Place two olive slices or small dots of cream cheese with tiny olive pieces inside to create the eyes.
5. Fill in the board
Surround the mummy shape with grapes, berries, apple slices, nuts, and crackers. Keep the colors balanced so the board feels full and festive without looking crowded.
6. Finish with garnish
Add a few fresh herb sprigs around the edges for a polished look. Serve right away, or chill briefly until you are ready to bring it to the table.
Tips for Success
Keep the ingredients dry, especially fruit, so the board stays neat longer. If you are making it ahead, slice apples just before serving or toss them lightly with lemon juice to slow browning.
Try to vary the shapes on the board. Long crackers, round fruit, cube-shaped cheese, and curly pretzels make the whole display look more interesting.
Variations of Mummy Charcuterie Board
You can easily make this board sweeter by adding cookies, chocolate squares, and marshmallows. For a more savory version, include extra cheese, olives, roasted vegetables, and seasoned nuts.
If you want a kid-friendly version, keep the flavors simple with mild cheese, sliced fruit, crackers, and a creamy dip. For a larger party board, double the ingredients and add more height with small bowls of dips.
Serving Suggestions: What to Pair with Mummy Charcuterie Board
Serve this board with sparkling water, apple cider, or a simple fruit punch. It also pairs nicely with soup, sandwiches, or a light pasta dish if you are turning it into a fuller meal.
For a party table, set it near other easy finger foods so guests can graze. It makes a lovely match with mini sliders, veggie cups, or a seasonal dessert tray.
Storage & Reheating Instructions
Charcuterie boards are best served fresh, but leftovers can be stored in airtight containers in the refrigerator. Keep fruit, crackers, cheese, and meats separate when possible so the textures stay better.
There is no reheating needed for this board. If the cheese has been chilled, let it sit at room temperature for a few minutes before serving so the flavor is softer and more enjoyable.
Memories Made Around the Table
There is something so cheerful about a snack board that makes people smile before they even take a bite. This kind of recipe often becomes the thing everyone gathers around first, which is part of the fun.
FAQs
Can I make this board ahead of time?
Yes, you can prep most of the ingredients a few hours ahead. For the best look, assemble the board closer to serving time and add fruit like apples at the end.
What can I use instead of olives for the eyes?
You can use small dots of cream cheese with tiny herb pieces, capers, or bits of cucumber skin. Anything small and dark will help create the face.
How do I keep the board from looking too busy?
Start with the mummy shape first, then fill in around it slowly. Leave a little negative space so the design stays clear and easy to see.
Can I make it without meat?
Yes, just replace the meat with extra cheese, vegetables, fruit, crackers, nuts, and dips. The board will still look festive and feel abundant.
Final Thoughts
This mummy shaped charcuterie board idea is proof that a simple snack spread can feel creative and memorable. With a few thoughtful ingredients, you can make a board that is easy to assemble, fun to serve, and wonderful to share.