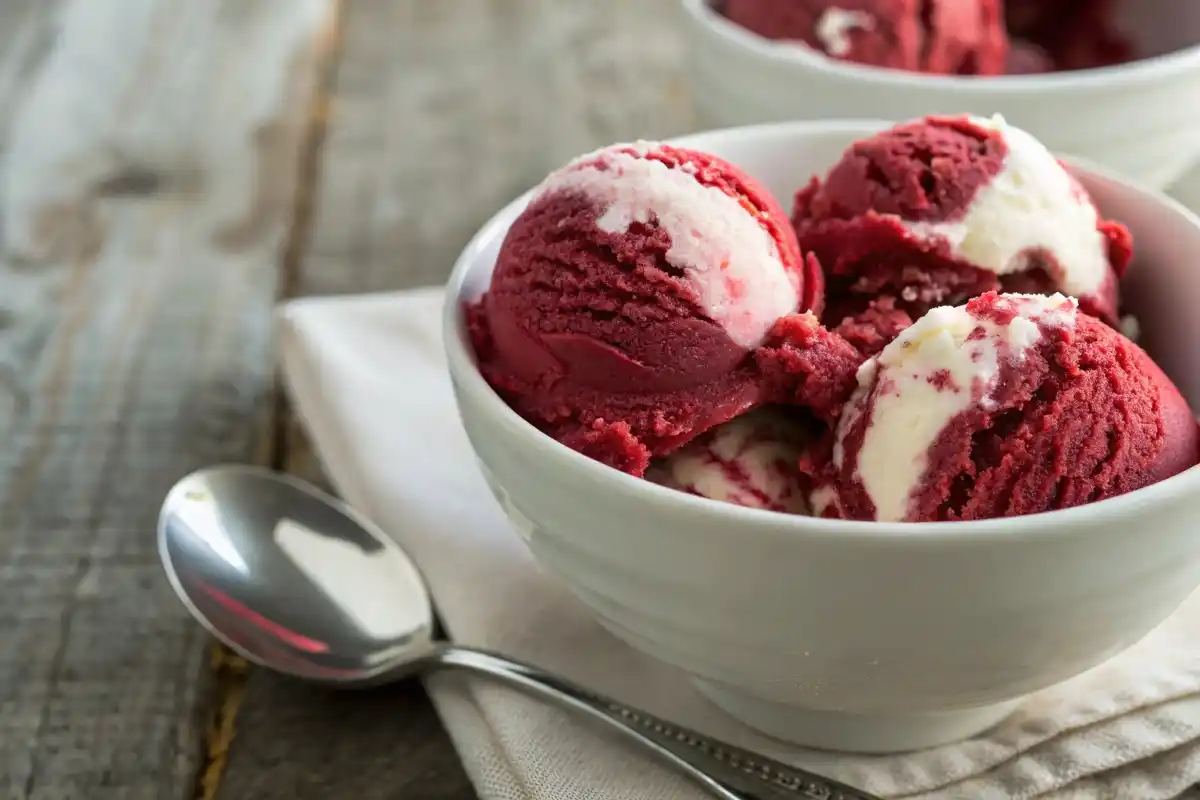
Imagine a dessert that turns any moment into a flavor celebration. Red velvet cake and ice cream come together in a taste adventure. It’s a treat that will make your taste buds dance.
Your search for the ultimate ice cream with red velvet cake ends here. This dessert mixes the smoothness of red velvet with the coolness of ice cream. It’s inspired by Dairy Queen’s special Valentine’s Day treats, now in your kitchen.
Get ready for a delicious journey with this red velvet ice cream. It’s perfect for anyone who loves cooking or desserts. Every scoop is a mix of flavors that’s a true sweet delight.
Jump ahead to:
Understanding the Magic of Red Velvet Ice Cream
Red velvet ice cream has won over dessert fans with its rich flavors and smooth texture. It turns the classic red velvet cake into a cool, creamy treat that excites your taste buds. If you’re curious about other ways to enjoy this classic flavor, check out what is red velvet ice cream made of, which breaks down its key ingredients and taste profile.
The Origin of Red Velvet Flavor
The tale of red velvet starts in the early 1900s. The red color came from a mix of cocoa powder and buttermilk. Velvet cake ice cream swirls today honor this old dessert, adding a nostalgic touch to frozen treats.
- Originated in the 1930s during the Great Depression
- Initially created as a marketing strategy by food companies
- Became popular in Southern United States
Why This Combination Works
The charm of red velvet ice cream is in its balanced flavors. The cocoa undertones mix well with the creamy base, making a perfect blend. This turns a simple treat into a fancy indulgence.
“Red velvet is more than a color it’s a flavor experience that tells a story with every bite.” Culinary Experts
The mix works because of a few important things:
- Rich, velvety texture that melts smoothly
- Balanced blend of cocoa and cream cheese flavors
- Visually appealing deep red color
- Nostalgic connection to traditional Southern desserts
Trying red velvet ice cream is more than just eating a dessert. It’s experiencing a culinary tradition in a cool, creamy way.
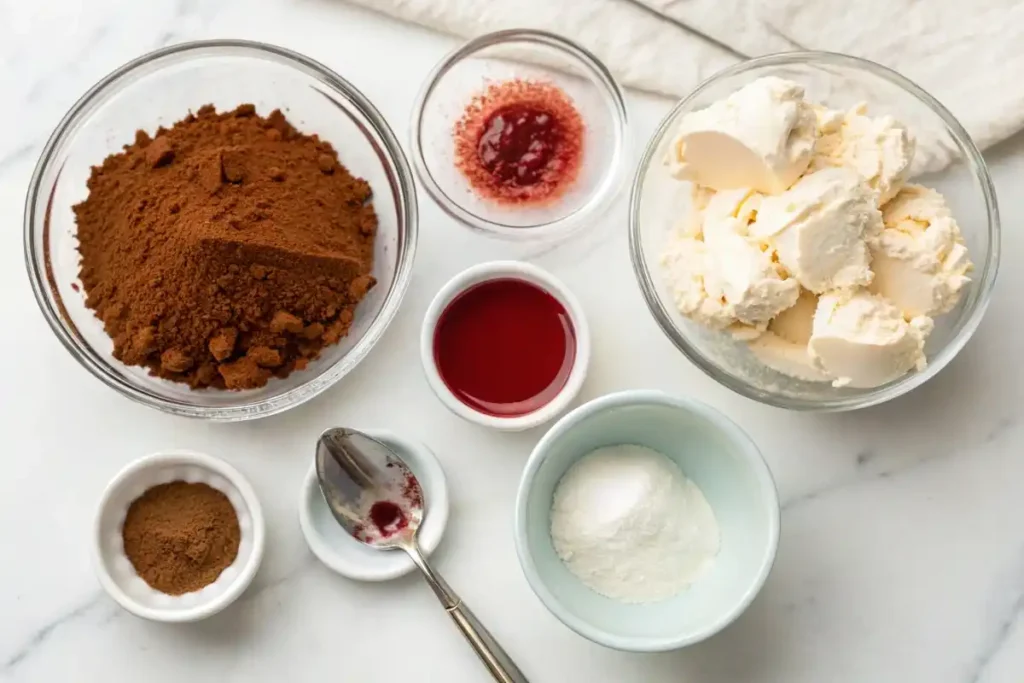
Essential Ingredients for Perfect Red Velvet Ice Cream
Making red velvet ice cream is all about picking the right ingredients. These ingredients come together to make your ice cream truly special. It’s about turning ordinary ice cream into a unique treat.
For a perfect pairing, try making cream cheese icing for red velvet cake to drizzle over your ice cream for an extra indulgent touch.
Let’s look at the key ingredients that make this recipe stand out:
- Half-and-half (1½ cups): Provides rich, creamy base
- Cream cheese (½ cup): Delivers signature tangy flavor
- Condensed milk (½ cup): Adds sweetness and smooth texture
- Cocoa powder (¼ cup): Creates authentic red velvet depth
- Red food coloring gel (½ teaspoon): Ensures iconic vibrant color
- Vanilla extract (1 teaspoon): Enhances overall flavor profile
The secret to this recipe is finding the right balance. Cream cheese adds a tangy taste, while cocoa powder brings the red velvet flavor. Red food coloring gel makes the ice cream look amazing.
“Perfect ice cream is about harmony between ingredients and technique”
Choose high-quality ingredients for the best results. Use full-fat cream cheese, premium cocoa powder, and pure vanilla extract. This will make your dessert mashups truly special.
| Ingredient | Purpose | Quantity |
|---|---|---|
| Half-and-half | Creamy base | 1½ cups |
| Cream cheese | Tangy flavor | ½ cup |
| Cocoa powder | Depth of flavor | ¼ cup |
Start your journey to making perfect frozen treats by understanding each ingredient’s role. Experiment, taste, and enjoy the process!
Required Kitchen Equipment and Tools
Making red velvet ice cream needs the right tools. The right equipment is key to success. Let’s look at what you need to make the perfect ice cream.
Ninja Creami Machine: Your Ice Cream Making Companion
The Ninja Creami is a must-have for ice cream lovers. It turns frozen mixtures into creamy ice cream easily. It also lets you change the texture of your ice cream.
- One-touch ice cream function
- Multiple texture settings
- Easy to clean design
- Compact kitchen-friendly size
Alternative Equipment Options
Not everyone has a Ninja Creami. But, you can make great ice cream with other methods:
- Traditional ice cream maker
- Blender with freezing capabilities
- No-churn method using a standard mixer
- Freeze-and-blend technique
Essential Measuring Tools
Getting the measurements right is important for perfect ice cream. You’ll need:
| Tool | Purpose |
|---|---|
| Digital kitchen scale | Accurate ingredient measurements |
| Liquid measuring cups | Precise liquid ingredient quantities |
| Dry measuring cups | Exact dry ingredient portioning |
| Instant-read thermometer | Temperature control during preparation |
Pro tip: Invest in quality measuring tools to ensure consistent results every time you make your red velvet ice cream.
With the right tools, you’re set for your ice cream adventure. Each tool is important for turning simple ingredients into a show-stopping dessert. It will wow your family and friends.
Step-by-Step Guide to Ice Cream with Red Velvet Cake
Making ice cream with red velvet cake is all about precision and passion. This guide will show you how to make a treat that mixes red velvet’s rich flavors with creamy ice cream.
To start your red velvet ice cream journey, collect these essential ingredients:
- 8 oz cream cheese
- 1 cup heavy cream
- 1 cup whole milk
- 3/4 cup sugar
- 1 tablespoon cocoa powder
- 1 tablespoon plus 1 teaspoon red food coloring
- 1 teaspoon salt
Getting ready for your ice cream with red velvet cake is important:
- Chill ingredients in the refrigerator for 2 hours
- Blend cream cheese, heavy cream, milk, and sugar until smooth
- Add cocoa powder and red food coloring
- Mix well to get a bright red color
When making the base mixture, temperature control is key. Make sure all ingredients are cold. This helps create a smooth, rich texture for your frozen treats.
“The secret to perfect ice cream is in the details” Culinary Experts
For the best results, use a Ninja Creami machine or similar ice cream maker. After blending, pour the mixture into a pint container and freeze overnight. This lets the flavors meld and the texture set perfectly.
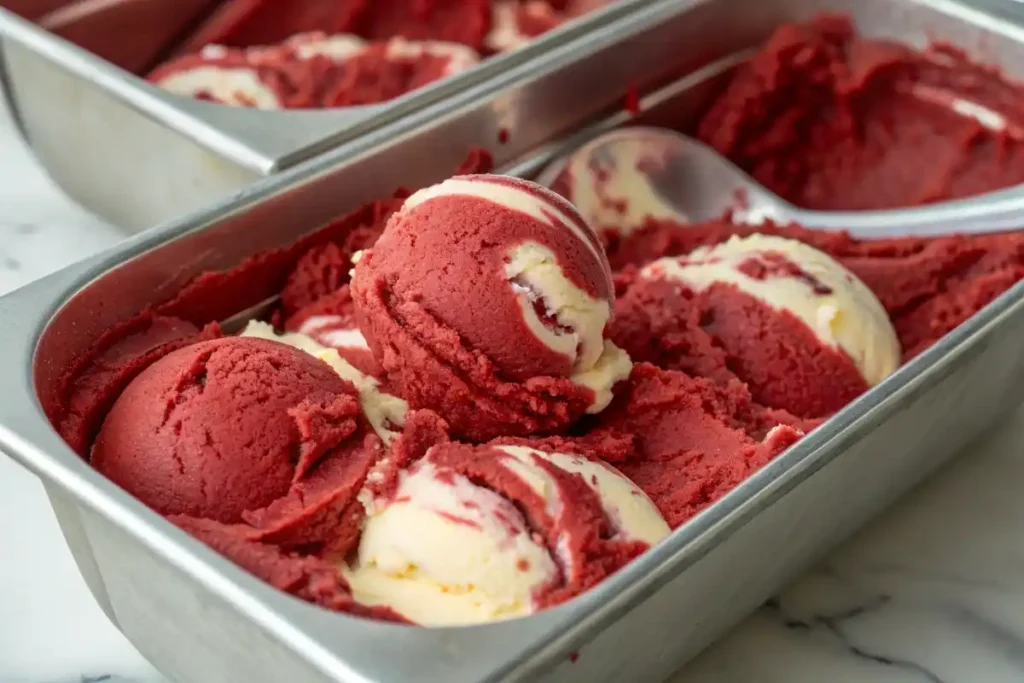
To add red velvet cake pieces, slice an 8-inch round cake into thin layers. Crumble or cut small pieces to fold into your ice cream during the final processing stage. This creates a delightful swirl effect.
Mastering the Base Mixture Preparation
Creating the perfect red velvet ice cream starts with a well-prepared base mixture. It’s all about blending and color development. These steps will make your cake flavor combinations stand out.
Precise Blending Techniques
To make your red velvet ice cream base, follow these steps:
- Use a high-powered blender for smooth incorporation
- Blend ingredients at medium speed for 2-3 minutes
- Scrape down mixing bowl sides to ensure complete integration
Achieving Vibrant Color and Texture
The signature red velvet ice cream color is key. Gel food coloring is best for texture and rich color. Just 1-2 drops of concentrated gel coloring will give you a stunning crimson shade.
Temperature Control Mastery
Keeping ingredients at 40-45°F is vital for success. This prevents separation and ensures a creamy texture.
“Perfect ice cream is a delicate balance of temperature, technique, and passion.” Artisan Ice Cream Maker
Mastering these techniques will help you make a top-notch red velvet ice cream. It will impress with its color and taste.
Expert Tips for Achieving the Perfect Swirl
Making stunning velvet cake ice cream swirls needs skill and technique. Premium ice cream flavors need careful making. This ensures every bite is full of taste and looks great.
The key to perfect velvet cake ice cream swirls is three things:
- Cake piece size and texture
- Temperature control
- Swirling technique
When adding cake to your ice cream, use pieces that are about ½ inch in size. Bigger pieces can mess up the smooth texture. Smaller ones might melt away.
“The art of the perfect swirl is about balance and precision” Artisan Ice Cream Experts
Keeping the right temperature is key for your velvet cake ice cream swirls. Freeze cake pieces before mixing to avoid soggy textures. Chill them for at least 1 hour before adding them to the ice cream base.
| Swirl Technique | Recommended Method |
|---|---|
| Layering | Alternate ice cream and cake pieces in thin layers |
| Folding | Gently fold cake pieces using figure-eight motion |
| Distribution | Ensure even spread throughout the mixture |
To get the real red velvet look, use gel food coloring. Two tablespoons of liquid red food coloring will give your ice cream swirls that classic red color.
Storage and Serving Recommendations
Making the perfect red velvet ice cream needs careful storage and presentation. Your frozen treats should get special care to keep their great taste and texture.
Optimal Storage Conditions
Start by storing your red velvet ice cream right. Use an airtight container in a freezer that’s -10°F to -20°F. This keeps your ice cream creamy and flavorful.
| Storage Parameter | Recommended Conditions |
|---|---|
| Freezer Temperature | -10°F to -20°F |
| Maximum Storage Duration | 2-3 months |
| Container Type | Airtight with Tight-Fitting Lid |
Creative Presentation Ideas
Make your frozen treats look amazing with these ideas:
- Serve in chilled dessert glasses for an elegant touch
- Create layered parfaits with crumbled red velvet cake pieces
- Garnish with fresh berries or chocolate shavings
- Allow ice cream to soften for 5-10 minutes before serving
Pro tip: For the best texture, let your ice cream sit at room temperature for about 5-10 minutes before serving.
Follow these tips for storage and presentation. Your decadent dessert mashups will be a hit, looking as good as they taste.
Troubleshooting Common Issues
Making unique flavors like red velvet ice cream can be tricky. Knowing common problems helps you make sweet treats with confidence.
Texture and Consistency Problems
Ice crystal formation is a big issue in homemade ice cream. To avoid it, follow these tips:
- Use full-fat dairy ingredients for a smoother texture
- Make sure to churn properly
- Freeze at a consistent temperature
Color and Flavor Challenges
| Issue | Solution |
|---|---|
| Weak Red Color | Add extra food coloring drops carefully |
| Bland Flavor | Increase vanilla and cocoa powder quantities |
| Overly Sweet Mixture | Adjust base mixture before freezing |
Pro tip: Make your ice cream base a bit sweeter than you want it. Freezing will make it less sweet. Always freeze for 24 hours for the best taste.
“Patience and precision are the secret ingredients in creating perfect red velvet ice cream.” Culinary Expert
By knowing these common problems, you can make a delicious red velvet ice cream. It will show off your cooking skills.
Nutritional Information and Dietary Considerations
Exploring frozen desserts, our red velvet cake ice cream is a tasty treat with nutritional insights. Knowing its caloric and nutritional profile helps you enjoy it wisely.
Caloric Content and Macronutrients
A single serving of this ice cream offers a rich nutritional profile. Here’s a breakdown of the key nutrients:
| Nutritional Component | Amount per Serving |
|---|---|
| Calories | 373 kcal |
| Carbohydrates | 31.2g |
| Protein | 8.2g |
| Fat | 24g |
| Sugar | 30.5g |
Dietary Modifications
Frozen desserts can be modified for different dietary needs:
- Lactose-Intolerant Options: Use almond or coconut milk as a base
- Low-Sugar Alternatives: Replace sugar with stevia or monk fruit sweetener
- Vegan Variations: Substitute dairy ingredients with plant-based alternatives
Even with calorie watching or dietary restrictions, you can enjoy red velvet cake ice cream. Just try these creative modifications.
Conclusion
Your journey into making premium ice cream flavors doesn’t stop here. The red velvet ice cream recipe is a fun way to mix cake flavors into a cool treat. It lets you explore your creativity in the kitchen.
This recipe is easy and flexible. With a few protein-rich ingredients and some creativity, you can make a dessert that’s both healthy and tasty. The Ninja Creami makes it simple, so even beginners can make top-notch ice cream easily.
Remember, trying new things is important to get your red velvet ice cream just right. Feel free to change ingredients, adjust sweetness, or add different mix-ins. Each try is a chance to get better and make a dessert that’s all your own.
Homemade ice cream is more than just a sweet treat. It’s about making happy moments, sharing yummy times with family and friends, and enjoying the art of cooking. So, get your Ninja Creami ready, gather your ingredients, and start your red velvet ice cream journey today!
FAQ
What makes red velvet ice cream different from other flavors?
Red velvet ice cream is special because of its mix of cocoa flavor, creamy texture, and red color. It has cream cheese undertones that make it different from regular chocolate or vanilla ice cream. This creates a richer and more indulgent treat.
Can I make red velvet ice cream without a special ice cream maker?
Yes, you can make red velvet ice cream without a Ninja Creami. You can use a traditional ice cream churner, a no-churn method with condensed milk, or even a food processor. Each method needs careful attention to ingredients and freezing to get the right creamy texture.
How long can I store homemade red velvet ice cream?
Homemade red velvet ice cream can last 2-3 weeks in an airtight container at 0°F (-18°C) or below. For the best taste and texture, eat it within two weeks. Always keep it in a tightly sealed container to avoid ice crystals and flavor loss.
Is red velvet ice cream very high in calories?
Red velvet ice cream is quite rich, with about 250-300 calories per half-cup. The calories come from heavy cream, sugar, and cake pieces. If you’re watching calories, try portion control or use lighter ingredients like alternative milks or less sugar.
Can I make a dairy-free version of red velvet ice cream?
Yes! You can make a dairy-free version by using coconut milk, almond milk, or cashew cream instead of dairy. Choose dairy-free cream cheese and make sure your food coloring and mix-ins are also free from dairy for a vegan-friendly treat.
What’s the secret to getting the perfect red color?
For the perfect red color, use high-quality red food coloring and mix it with cocoa powder carefully. Start with a little and add more until you get the right red. Beetroot powder can also add color and a bit of sweetness.
How do I prevent ice crystals from forming in my homemade ice cream?
To avoid ice crystals, use ingredients with fat, mix well, and control the freezing temperature. Adding a bit of alcohol or corn syrup can help. Cool your base completely before freezing and store it in an airtight container to keep it moist-free.
Can I add mix-ins to my red velvet ice cream?
Yes! You can add mix-ins like cake pieces, chocolate chips, cream cheese chunks, or a swirl of frosting. Just be careful not to overdo it, as too many mix-ins can ruin the smooth texture. Add them sparingly for the best taste.