
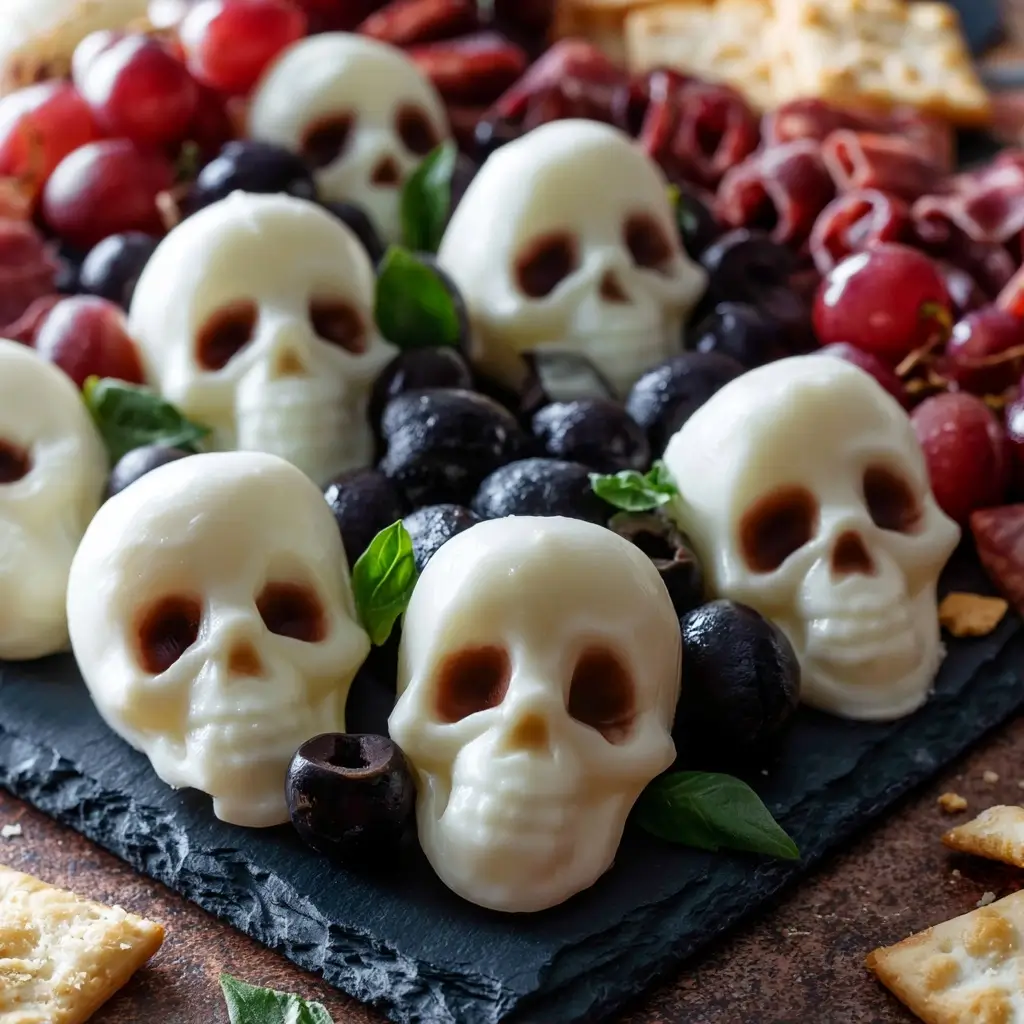
These Halloween Mozzarella Skulls are such a fun way to dress up a spooky snack board, and they come together with just a few simple ingredients. I love how they add a playful touch to charcuterie-style spreads, especially when paired with crackers, fruit, and a few savory bites.
Halloween Mozzarella Skulls
Ingredients
- 8 oz fresh mozzarella preferably small balls or a log that can be cut to fit your mold
- 1 tbsp water for softening and handling the cheese if needed
- 0.25 tsp salt optional, for a little extra flavor
- 1 tbsp black sesame seeds or chopped herbs optional, for serving
Instructions
- Start by cleaning and drying your skull-shaped mold thoroughly. If the mold is rigid, make sure it is food-safe and lightly dampened only if needed for easier release.
- Cut the mozzarella into pieces that fit the mold cavities. Press the cheese gently into each skull shape, making sure it fills the details as evenly as possible.
- Place the filled mold in the refrigerator for a short time so the cheese firms up and holds its shape. This helps the skulls release more cleanly when it is time to serve.
- Carefully remove each mozzarella skull from the mold and place it on your charcuterie board. Add your favorite board ingredients around it, then finish with herbs or seeds if you want a little contrast.
Notes
Why You’ll Love This Halloween Mozzarella Skulls
This recipe is festive, easy to assemble, and perfect when you want one eye-catching element for a Halloween board. The mozzarella has a creamy, mild flavor that pairs well with sweet, salty, and crunchy foods, so it fits right in with almost any spread.
It also uses simple ingredients and can be prepared ahead of time, which makes party planning a little easier. Best of all, the skull shape gives your table a spooky, homemade feel without much effort.
Halloween Mozzarella Skulls Ingredients & Substitutions
You only need a few ingredients to make these spooky bites. Here is what to gather:
- Fresh mozzarella, preferably small balls or a log that can be cut to fit your mold
- Water, for softening and handling the cheese if needed
- Salt, optional, for a little extra flavor
- Black sesame seeds or chopped herbs, optional for serving
If you cannot find small mozzarella pieces, use a larger block and slice it into portions that fit your skull mold. You can also skip the garnish and let the shape do all the work. For serving boards, add grapes, apple slices, olives, crackers, and nuts to round out the presentation.
Step-by-Step Instructions to Make Halloween Mozzarella Skulls
Step 1: Prepare the mold
Start by cleaning and drying your skull-shaped mold thoroughly. If the mold is rigid, make sure it is food-safe and lightly dampened only if needed for easier release.
Step 2: Shape the mozzarella
Cut the mozzarella into pieces that fit the mold cavities. Press the cheese gently into each skull shape, making sure it fills the details as evenly as possible.
Step 3: Chill until set
Place the filled mold in the refrigerator for a short time so the cheese firms up and holds its shape. This helps the skulls release more cleanly when it is time to serve.
Step 4: Unmold and arrange
Carefully remove each mozzarella skull from the mold and place it on your charcuterie board. Add your favorite board ingredients around it, then finish with herbs or seeds if you want a little contrast.
Tips for Success
Use the freshest mozzarella you can find, since it has the best flavor and texture for this recipe. If the cheese feels too soft, chill it a bit longer before unmolding so the details stay sharp.
For the cleanest look, press the mozzarella evenly into the mold and avoid overfilling. A lightly chilled board also helps the cheese stay neat once assembled.
Variations of Halloween Mozzarella Skulls
Try adding a small leaf of basil or a tiny piece of roasted pepper beside each skull for extra color. You can also use different shaped molds if you want to create a whole spooky cheese tray with ghosts, pumpkins, or bats.
For a sharper flavor, serve the skulls with aged cheese cubes, marinated artichokes, and savory crackers. If you want a softer, fresher board, pair them with berries, cucumber slices, and honey.
Serving Suggestions: What to Pair with Halloween Mozzarella Skulls
These skulls look especially cute on a Halloween charcuterie board with grapes, olives, crackers, pita chips, and sliced apples. They also work well alongside hummus, roasted nuts, and cherry tomatoes for a colorful mix.
If you are serving a larger crowd, add a small bowl of pesto or tomato dip nearby so guests can build their own bites. The mild mozzarella balances beautifully with both bright and savory flavors.
Storage & Reheating Instructions
Store any leftover mozzarella skulls in an airtight container in the refrigerator for up to 2 days. Keep them separate from strong-smelling foods so they stay fresh and mild.
This recipe does not need reheating. For the best texture, let the cheese sit at room temperature for a few minutes before serving again.
Memories Made Around the Table
Recipes like this always remind me that the smallest details can make a gathering feel special. A playful cheese shape can turn a simple board into something everyone talks about, and that is the kind of kitchen magic I love most.
FAQs
Can I make these mozzarella skulls ahead of time?
Yes, you can make them a few hours ahead and keep them chilled until serving. For the best shape, unmold them close to party time.
What kind of mozzarella works best?
Fresh mozzarella with a firmer texture works best because it holds shape well. If it is very soft, chill it before pressing it into the mold.
Do I need a special mold?
A skull-shaped mold makes the look extra fun, but any food-safe mold with enough detail will work. Just make sure the cheese can be released cleanly.
What can I serve with these on a board?
Crackers, fruit, olives, nuts, and small spreads all pair nicely. The mild mozzarella makes it easy to build a board with both sweet and savory flavors.
Final Thoughts
Halloween Mozzarella Skulls are a simple way to make your spooky spread feel thoughtful and festive. With just a little shaping and chilling, you get a board-friendly bite that is playful, tasty, and easy to love.