
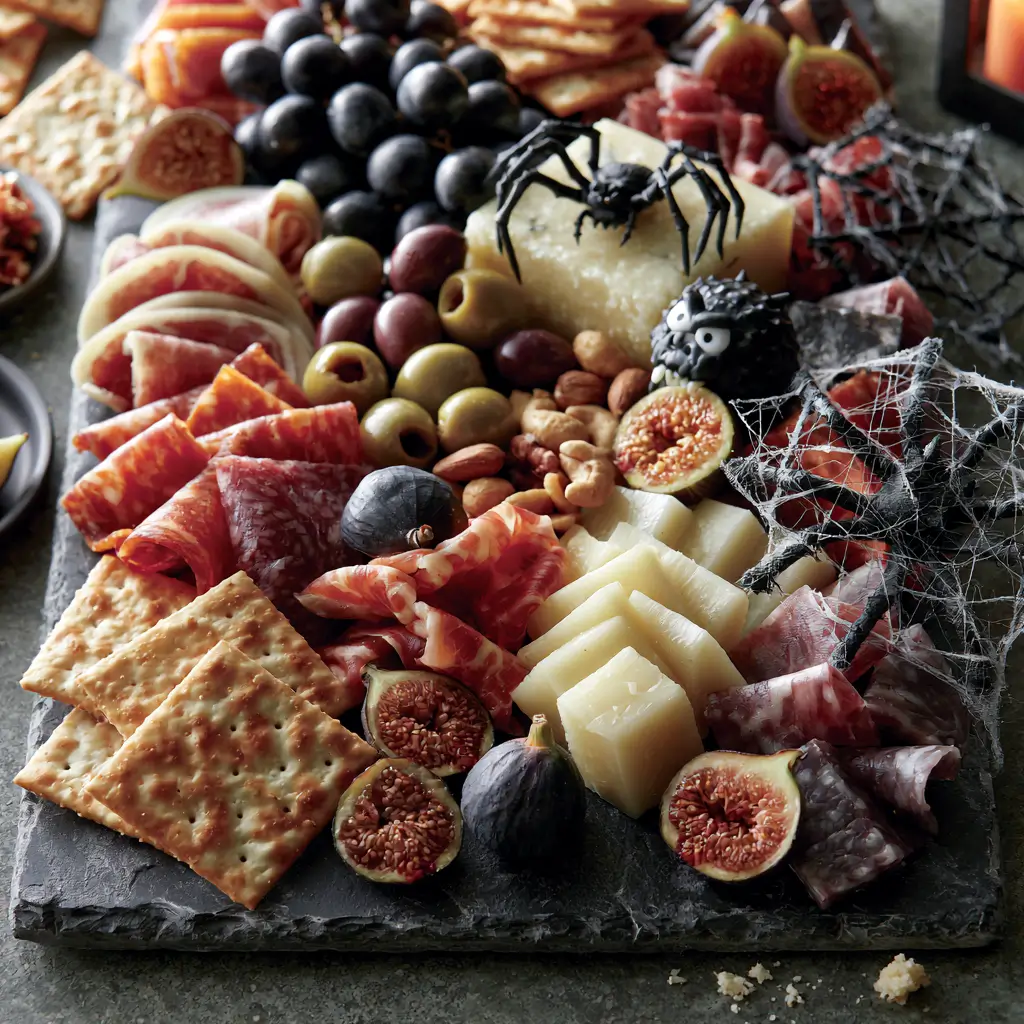
If you want a festive spread that feels fun, easy, and a little spooky, this Halloween charcuterie board is such a great place to start. It is perfect for parties, family movie nights, or a laid-back fall gathering with plenty of color and flavor.
Halloween Charcuterie Board
Equipment
- 1 Large cutting board or serving platter
- 1 Small bowls or ramekins for dips, olives, and pickles
Ingredients
Board Ingredients
- Assorted cured meats such as salami, turkey salami, or turkey pepperoni
- Cheeses such as cheddar, gouda, brie, and mozzarella
- Crackers breadsticks, or sliced baguette
- Fresh fruit such as grapes, apple slices, figs, or strawberries
- Pickles or olives
- Nuts such as almonds or pecans
- Halloween candies chocolate pieces, or candy eyes for decoration
- Dips such as mustard, honey, or jam
- Optional garnish such as fresh rosemary, thyme, or edible flowers
Instructions
- Start with a large cutting board, serving platter, or tray. A wooden board gives a cozy fall look, but any flat surface will work.
- Set down the bowls, small jars, or ramekins for dips, olives, pickles, and honey. Then add the biggest cheese pieces so they anchor the design.
- Fold or roll the cured meats and place them in small clusters around the board. Tuck them near the cheeses so guests can build easy bites.
- Arrange crackers, breadsticks, grapes, apple slices, and other fruit around the open spaces. Keep colors varied so the board feels full and lively.
- Scatter candy, chocolate pieces, or candy eyes in a few spots for a playful touch. Finish with herbs or small decorative accents to bring in that autumn feel.
- If you are serving soon, keep the board at room temperature for the best texture. If you need to prep ahead, cover and chill it, then add crackers and candy just before serving.
Notes
Why You’ll Love This Halloween Charcuterie Board
This board is all about simple assembly with a big visual payoff. You can mix savory bites, creamy cheeses, crisp crackers, fruit, and Halloween candies for a spread that looks impressive without much effort.
It also works well for different tastes and diets at the same table. You can build it ahead, adjust the size for any crowd, and make it as playful or as elegant as you like.
Halloween Charcuterie Board Ingredients & Substitutions
Here is a flexible mix of ingredients to create a balanced board:
- Assorted cured meats, such as salami, turkey salami, or turkey pepperoni
- Cheeses, such as cheddar, gouda, brie, and mozzarella
- Crackers, breadsticks, or sliced baguette
- Fresh fruit, such as grapes, apple slices, figs, or strawberries
- Pickles or olives
- Nuts, such as almonds or pecans
- Halloween candies, chocolate pieces, or candy eyes for decoration
- Dips, such as mustard, honey, or jam
- Optional garnish, such as fresh rosemary, thyme, or edible flowers
Substitution ideas are easy here. Use turkey-based cured meats instead of pork-based options, choose any favorite cheeses, and swap fresh fruit based on what looks best in season. For a sweeter board, add extra chocolates or cookies. For a more savory board, increase the olives, nuts, and cheese.
Step-by-Step Instructions to Make Halloween Charcuterie Board
Step 1: Choose Your Board
Start with a large cutting board, serving platter, or tray. A wooden board gives a cozy fall look, but any flat surface will work.
Step 2: Place the Larger Items First
Set down the bowls, small jars, or ramekins for dips, olives, pickles, and honey. Then add the biggest cheese pieces so they anchor the design.
Step 3: Add the Cured Meats
Fold or roll the cured meats and place them in small clusters around the board. Tuck them near the cheeses so guests can build easy bites.
Step 4: Fill in with Crunch and Fruit
Arrange crackers, breadsticks, grapes, apple slices, and other fruit around the open spaces. Keep colors varied so the board feels full and lively.
Step 5: Add Halloween Details
Scatter candy, chocolate pieces, or candy eyes in a few spots for a playful touch. Finish with herbs or small decorative accents to bring in that autumn feel.
Step 6: Serve Right Away or Chill Briefly
If you are serving soon, keep the board at room temperature for the best texture. If you need to prep ahead, cover and chill it, then add crackers and candy just before serving.
Tips for Success
Use a mix of shapes and textures so every bite feels interesting. Soft cheese, firm cheese, juicy fruit, salty meats, and crisp crackers all help the board feel complete.
Also, think about color. Orange cheddar, dark grapes, green herbs, and pale crackers create a nice Halloween palette without needing much decoration.
If you are building the board for a party, make a little more than you think you need. Guests always seem to love the cheese and meat pieces first.
Variations of Halloween Charcuterie Board
You can easily turn this into a dessert-style board by leaning on cookies, brownies, chocolate, and caramel dip. Add a few fresh berries or sliced apples for balance.
For a kid-friendly version, keep the meats and cheeses simple, then add mini pretzels, cheese cubes, fruit snacks, and fun-shaped crackers.
If you want a more elevated board, use artisan cheeses, dried fruit, rosemary, fig jam, and roasted nuts for a refined fall look.
Serving Suggestions: What to Pair with Halloween Charcuterie Board
This board pairs nicely with sparkling water, apple cider, or a warm fall punch. If you are serving a larger meal, it also works as a starter before soup, pasta, or roasted chicken.
For an appetizer table, serve it alongside stuffed mushrooms, roasted vegetables, or a simple salad so guests have plenty of choices.
Storage & Reheating Instructions
Store leftover meats and cheeses in separate airtight containers in the refrigerator. Fruit should be kept in its own container so it stays fresh longer.
There is no reheating needed for this board. If crackers soften, replace them with fresh ones before serving again. For best texture, assemble only what you plan to serve within a few hours.
Memories Made Around the Table
One of my favorite things about a board like this is how it brings people together. Everyone reaches, chats, and builds their own little plate, which makes the whole evening feel relaxed and welcoming.
FAQs
Can I make this Halloween charcuterie board ahead of time?
Yes, you can prep most of it a few hours ahead. Add crackers, fresh herbs, and candy close to serving time so everything stays crisp and fresh.
What cheeses work best for a Halloween charcuterie board?
Cheddar, gouda, brie, mozzarella, and pepper jack all work well. Choose a mix of soft and firm cheeses for variety.
How do I keep the board from looking empty?
Use small clusters and fill gaps with fruit, nuts, herbs, and crackers. A full board usually looks better than a sparse one.
Can I make this without cured meats?
Yes, you can skip the meats and add more cheese, fruit, nuts, and savory snacks like olives, marinated vegetables, or crackers with dip.
Final Thoughts
This Halloween charcuterie board is a simple way to make your table feel festive and welcoming. With a few smart ingredients and a playful touch, you can create a spread that looks beautiful and tastes even better.